Carol P. Boynton
To practice working with the scientific method, this unit will use recipes as science experiments to develop an understanding of the process of trying to answer a question. The main objective for each activity is that through testing we will discover whether foods will combine or not combine, or the question being can we separate the ingredients after performing the experiment. The students will talk about what they know, determine the question for the experiment, develop a hypothesis, conduct the experiment and find their results. Does just stirring things together mean they can be separated? If heat is part of the process, will that change the outcome? What happens when we use a blender? Do the ingredients make a difference in taking foods apart? What does mixing together do to dry ingredients? wet ingredients? wet and dry together? Actually doing the experiments will help the students begin thinking about new questions and hypotheses.
The general plan for this unit is to pace it out over eight weeks or roughly one marking period with lessons twice a week. It will begin with an introductory discussion about becoming cooking scientists, sharing family stories they may have of preparing food, what kinds of foods they enjoy, describing foods by shape, color, size, where food comes from. This somewhat unstructured discussion will end with the "announcement" that we are going to be turning our classroom into a cooking laboratory, showing the students some of the tools, equipment and supplies we will be using. It is important to let the students know that this unit will take several weeks and that they will be practicing and learning to work with the tools and equipment before they actually begin working with food. This is the time to introduce an ongoing discussion of kitchen safety and working with food. Also during this first week, there will be two read alouds, Munch, Crunch, What's for Lunch by Janice Lobb and What is a Scientist? by Barbara Lehn which will continue to introduce the unit and our focus of food and science.
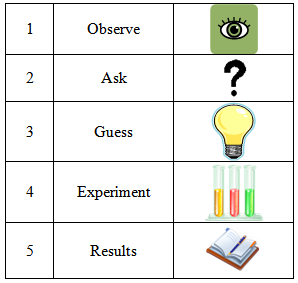
In the second week, after a review of the book What is a Scientist?, the students will be introduced to the steps of the scientific method, learning that this process will help them make discoveries. As the steps are discussed, the class will generate a chart together, further defining what each step means and how this whole process helps us keep track of our scientific work. This chart will be a great resource for the students for the duration our unit. They need to create a copy of the chart which will be part of their science journals. Discuss with the students what things can they observe, what questions they might have, can they make a guess about the answer, how should we do our experiment, what will our results be like?
Now the students can begin to have some fun working with cooking tools, naming them, and adding them to the science word wall. They will learn and practice proper measuring techniques using cooking equipment - measuring cups and spoons. To provide some background knowledge and experience, the students can practice measuring, mixing and separating ingredients that are not food. One strategy is to collect various objects used daily in the classroom, such as math counters, crayons, erasers, pennies, or any small objects. Put them all in a big tub or bowl, mix them together, and have the students sort, or to use our objective term, separate the objects. It is helpful to have the recipe available, written on the board or on chart paper or at the work tables for the students to follow. For example: 1 cup of counting bears, ½ cup of pennies, 7 crayons and so on depending on the ingredients chosen. This is also an opportunity to suggest new vocabulary for use throughout the unit - pieces, chunks, large, small, hard, solid, liquid.
The next four weeks will be focused on conducting the experiments from the classroom activities. The choices of experiments in this unit are the result of cooking experiences from my classroom. Throughout the school year, as either cultural or seasonal extensions to curricula, food has been used to enhance learning in various subject areas. Because these recipes have been successful for me in the past, I have chosen them to use as an introduction to the scientific method for first graders. Hands-on participation is important for the students. They must be involved and connected by actually doing the experiment, not just watching a demonstration. They need to measure, mix, stir, pour, scoop, cut, and serve. And then of course, eat.
The cooking activities are designed to be completed over two days as sets of comparative experiences: using similar ingredients to create two different outcomes. These experiences will show that they learn as they go and that as scientists conducting experiments, they are making discoveries. The first activity of making trail mix and granola bars will initiate an understanding that making simple changes in ingredients can result in a big change. They will find that separating trail mix after mixing the ingredients together is possible, but that separating the ingredients for the granola bar is not. Each set of recipes will generate this comparison - fruit salad can be separated, smoothies and applesauce cannot; vegetable soup can be separated, vegetable dip cannot; and finally hardboiled eggs (not including the shells!) can be taken apart and put together, scrambled eggs cannot. Generating a hypothesis for each experiment should become a more accessible task for the students; they can begin to make better predictions. The basis for the progression of experiments and recipes is to demonstrate that the scientific method will generate background knowledge and with that allow the students to be better informed scientists with each lesson.
This plan of action is not easily done alone. This unit is a great way to involve families through many avenues. Before the first week even begins, make sure the families are aware of the activities planned for the coming weeks. Encourage them to contribute their time, their equipment, and ingredients if they are able. It is also important that they know you will in fact be safely working with food and that we are making healthy choices for their children to enjoy. This open communication is essential and will result in an added level of excitement and enjoyment for the students. I have been successful with preparing a schedule of activities with family sign-up times to send home with the students. My experience has been that not only do they offer to help on a certain day or for a particular activity but are happy to bring equipment and help supply ingredients for that day.
Science Journals
Children this age have a genuine excitement for big changes, generally because at their young age it is a first experience, or the first one they remember. The more dramatic the experiments, certainly the more memorable they become. Making fun and tasty foods -- applesauce, smoothies, granola bars - that show exciting new forms during the experiment will be exciting for them. As we work through our experiments the students will, as does any scientist, keep track of their data and findings by maintaining a journal of processes and results. This will include illustrations and writing, as they use the generated charts and the word wall as resources.
As the students learn to collect, organize and record data, reading, writing and science will come together. The students will have knowledge and use of food vocabulary, scientific terms to use in their writing, and comprehension to discuss their findings. The journals, of course, will all be age appropriate. Each lesson or experiment will require three pages as follows. Based on student level and ability, they can either choose to write the recipe from the classroom copy or use a prepared printed version for their notebook.
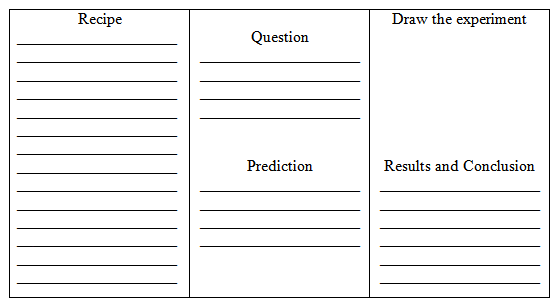
Page 1 - Recipe
Page 2 - Ask the question and make the prediction
Page 3 - Draw the experiment and write results and conclusion
Measuring
Before any cooking can begin, the students need to prepare with some basic cooking knowledge. This connection to the comparing and measuring curriculum is an exploratory investigation for the students. An introduction to measuring tools should be hands on activities that include practicing using measuring cups and spoons, working with liquids and solids, or wet and dry ingredients. This allows for discovery and experience, initiated by teacher demonstration of measuring techniques. To ensure that everyone has an opportunity for discovery, there will need to be a supply of several sets of measuring cups and spoons, which the students can bring from their own kitchens at home, another way to connect to real life for them.
Ingredients are measured in three different ways: by counting (four apples), by measuring volume (1/2 cup of applesauce) or by weight (a pound of apples). This unit will use only the first two methods but the students should be aware that, when reading recipes, the third method, the weight of ingredients, may be used.
It is most comfortable for the teacher and the students to begin with dry "ingredients" to practice accurate measuring. After covering the work surfaces with newspaper or tablecloths, place out bowls containing bird seed, sand, aquarium rocks, Styrofoam packing peanuts, and other non-food choices for the students to measure with cups and spoons. The reasoning is twofold for these choices - first, it is important to teach the students not to waste food and as this practice will not create anything to eat, we won't be wasting. Secondly, these items, or similar items that are readily available, do not require a monetary investment and will serve the purpose well. So we don't waste food or money to practice these skills!
Explain to the students that when we measure dry ingredients for cooking, everything goes to the top of the cup or spoon, not over or below but just right to the top. To accomplish this exactness, demonstrate that by using the back of a plastic butter knife, you can scrape the excess off the top of the overfilled cup or spoon to get the most accurate measurements. This lesson is designed for practice and should last for about 45 minutes from demonstration to clean up. All students should have an opportunity to try various ingredients to experiment with volume and density, what pours out well and what doesn't and other characteristics that they will observe while they practice.
Using vocabulary such large, medium, small, smaller, etc. instead of precise fractions is enough at this introductory lesson to discuss comparing amounts. This will help them record the day's activity in their science journals, using words and pictures to log in their experience with measuring. This is an important habit for the students to develop, writing down observations and questions, drawing pictures of results and conclusions, and thinking about what they might do next - the scientific method!
The second part of this measuring experience is to have the students use wet ingredients. The goal is the same, filling the cup or spoon to the top, or in the case of a "pitcher" style measuring cup, placing the cup on a flat surface and filling to the proper line then checking by looking at the cup at eye level. It is again important to demonstrate the procedure and allow for practice, in this case is to work on pouring as well as scooping. Keep a supply of paper towels handy and use colored water, a non-sticky ingredient. For variety, make the water choices different colors to keep the interest, putting some in bowls or pans and some in small pitchers to pour into measuring cups. This again is to prepare for working with real ingredients so it is important to practice and have the students feel prepared.