Stephanie J. Sheehan
Ways to change the state of matter include changing the temperature by adding or causing the substance to lose energy, applying pressure, and changing the chemical properties by adding something to it. The students will now have opportunities to experiment with changing states and creating suspensions.
Kitchen experiments that change the phases of matter
The following experiments allow the students to use the scientific method and create a physical change in foods from solid to liquid or from liquid to solid. The teacher may want to create a special "experiment log" for the students to write about each step of the scientific method as they experience it, along with their data, to be placed inside their science journals. A sample experiment log can be found in Appendix 4.
Changing Solids: Chocolate bars to Chocolate Sauce
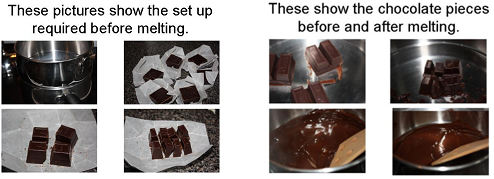
The teacher will begin by gathering the following materials: a medium pot with a long rubber handle and a "double boiler" pot that fits together with the former, several boxes of baking chocolate, a sharp knife (for the teacher to handle), timer, a wooden or rubber spoon, water and a stove or portable burner. Then, the following optional ingredients will be needed for the extension: sugar, vanilla extract, and heavy cream.
The students will have previously examined, stacked and sorted chocolate bars in their exploration of solids. They will also know from experience that chocolate can sometimes take liquid form. Now they will have a chance to make the solid bars turn into a delicious liquid chocolate sauce, but they will have to conduct an experiment first. The teacher will remind the students of the steps they must follow in order to use the scientific method to solve a problem. He or she will then ask the students to use their prior knowledge to predict what will make the chocolate bars change from solid to liquid. Then the class will discuss what happens to chocolate when left in the sun (or a warm room) on a warm summer day. Depending on the children's prior knowledge, the teacher may want to demonstrate chopping, pressing on, and heating the chocolate bars in order for the children to observe that heat causes the change.
The teacher will gather the materials and ask the students to predict whether the size of the chocolate pieces will affect the speed of the transformation from solid to liquid. He or she will lead the students to define a specific question that will allow them to figure this out. The students will record their predictions and reasoning in their journals. Next, the students will brainstorm ideas for testing their predictions. The students will most likely realize that they will need to compare two sets of differently sized chocolate pieces melting over heat. They may not realize that the amount of heat and time must be controlled. This is an opportune time to review the idea of controlling all variables except the one that is being tested. It will be important to explain that the pots must be the same, as well as the amount of chocolate in each pot, and the temperature, leaving the size of the chocolate pieces as the only difference between the two items you will be observing. That leaves the question of how to make sure the chocolate is heated at the same temperature in each pot. Although it is possible to measure the temperature of each with a thermometer, this would only allow the temperature to be checked, but not specifically set in order to make sure it is the same in both pots. Therefore, the teacher will have to lead the children to remember that they know the temperature of boiling water and to discover that boiling water under each pot will ensure that both pots are heating the chocolate at 212 degrees F, the boiling point of water.
The students will need to time the melting in order to determine how long it takes for each set of chocolate pieces to turn to liquid. The students will have to decide and agree ahead of time whether they will stop the timer when the transformation is complete, when more than half is liquid, or when it begins to melt. They will also have to determine if and when they will stir the chocolate as it melts. Then, they will observe both sets of chocolate and determine which became liquid faster. Together with the teacher, the class will write out the steps of the procedure they have agreed upon. It will also be important to discuss and agree upon how they will determine whether their hypothesis has been proven true or false. In other words, the students should be able to articulate what results they would expect to prove their hypothesis and what results would disprove it.
In order to improve the validity of the experiment, the data should be recorded for multiple trials. This can be done by way of the teacher recording data for each group and compiling it, or by actual repeated trials. The students will probably be happy to repeat this experiment to verify the results. If possible, it should be repeated several times, on more than one stove, in order to prove its universality. The students will record their observations with words and pictures in their journals and/or experiment logs.
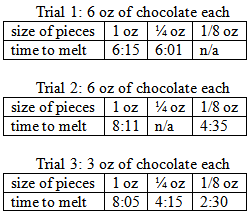
When I first conducted this experiment at home, the smaller, ¼ oz. chunks, of chocolate melted in 6 minutes and 1 second, compared to the larger, 1 oz. chunks, which melted in 6 minutes and 15 seconds. Since this was a very small margin, it proved the need for multiple trials. After this, I repeated the experiment, but compared 1 oz. chunks and 1/8
th
oz chunks. I further refined my experiment by comparing three sets of chocolate pieces: this time using 1 oz. chunks, ¼ oz. chunks, and 1/8 oz. chunks. As you can see from the data listed below, the smaller pieces always melted faster than the larger pieces, though there was considerable variation in melting times. The teacher might have students try one or more of these variations, and instruct students to conduct additional trials. Subsequent trials might use even smaller pieces of chocolate, such as chocolate chips, or use pieces of chocolate that have been cut differently, such as horizontally. The teacher should also ask the students for ideas of ways to alter the procedure further in order to better refine this experiment.
For a delicious extension, the students will make chocolate sauce using the liquid chocolate. Combine 1 cup heavy whipping cream, 1/3 cup sugar, 1/3 cup light corn syrup, 1 and ½ teaspoons vanilla extract, and mix the combination together with 12 oz. hot, melted chocolate
20
. The children may try a spoonful or dip fruit into the sauce.
Finally, the students will form teams according to preference of chocolate sauce or chocolate bars. They will prepare notes in writing and conduct a verbal debate attempting to convince the other team that the liquid sauce or the solid chocolate bar is best.
Changing Solid to a Liquid Solution: Sugar Cubes to Sugar Water
21
For the next experiment, the materials needed are sugar cubes, food coloring, water, a tablespoon, a plainly colored saucer, dish or bowl, a timer, and a spoon.
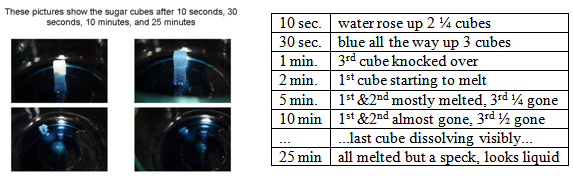
The teacher will display sugar cubes and ask the students to observe them and describe whether they are solid or liquid. He or she will then have them explain why they appear to be solid and ask them to describe them in writing and pictures, according to the criteria by which they examined the other solids earlier. Then, the teacher will pose the problem: is it possible for the sugar cubes to become liquid and how might this happen. He or she will help to define the question that will guide the experiment by asking students to predict what will happen when 3 sugar cubes are stacked and placed on a shallow pool of water. Students will discuss the question in groups and decide on a hypothesis. Then, they will have to explain what prior knowledge helped them to make this prediction. The teacher will then write out the steps of the procedure that the class must follow.
The students will also work in groups to complete the experimentation. The teacher will instruct each group to put a drop of food coloring in the water and pour a tablespoon of water onto a saucer. Then, one of the students will place the stack of sugar cubes on the pool of water. Another group member will keep track of elapsed time and another will be the record keeper. The students will observe and record what happens after 30 seconds, 1 minute and 2 minutes, etc. The record keeper will write the group's observations in a table such as the sample below. Since the water molecules are strongly attracted to the sugar molecules, the water will soak into the sugar and climb up the tower of sugar, causing the sugar cubes to become soggy and fall over. After observing this, the groups will discuss the results and decide whether the sugar is still a solid substance after the water has soaked in. They will have to defend their answers to the class and in their journals.
Changing Liquids to Solid: Making Ice Pops
The transformation of liquid to solid that the students may be most familiar with is that of water freezing and becoming solid ice. After studying various properties of the liquids provided to them, the students may be interested in creating solid juice pops from the liquid orange juice. Before they may eat the pops, however, they must conduct an experiment to see if the juice will become solid faster or slower than the water.
For this activity, the materials needed are two identical ice cube trays per group, orange juice, thermometers, timers, plastic knives, a freezer, and water. This activity will also take approximately two hours to complete data collection. It will be important for the students to poke and examine the juice and water at regular intervals, at least every ten minutes. However, since the data can be collected rather quickly at ten-minute intervals, the students may be able to work on another task between data collection duties. When I conducted this experiment at home, the juice and water started to change appearance after less than twenty minutes. The orange juice became more solid sooner than the water, yet the water ultimately formed uniformly solid ice cubes faster than the orange juice. This is because the orange juice has tiny orange pulp particles suspended within it. A selection of results you might expect can be found in the sample data table that follows.
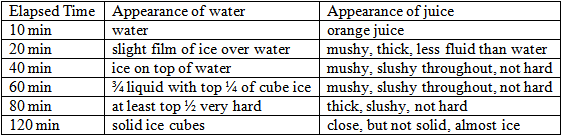
To conduct the experiment, the students will first need to decide what they will consider solid for the purposes of this experiment and come to an agreement in writing among the class members. Second, they will need discuss their prior knowledge and form a hypothesis. They will predict which liquid will freeze faster, and write their reasoning in their journals. Third, the teacher will lead the class to write a clear procedure. The students will have to make sure that the time is the only variable. Therefore, the teacher will lead the students to discover that they will need to make sure they have equal sized ice cube trays, equal amounts of the liquids, and room to freeze both liquids in the same area of the freezer with equal temperatures. The students will then measure the liquids, examine the trays, and use thermometers to make sure the freezer has equal temperatures in the areas where the ice cube trays will sit. The students will pour the liquids, place the trays in the freezer, and begin timing. Every ten minutes, they will need to examine and poke at cubes of each liquid to make observations and determine the consistency of each substance. The students will record the data at each time interval as they did for the sugar cubes. Finally, the students will record their observations and speculations about their results in their journals. Then, they will be able to eat the orange pops they have made! As a fun language extension, the students may conduct a debate about liquid orange juice versus orange ice pops, as they did for the chocolate.
Discovering Special Mixtures: Changing a Gel To a Solid- (Baking Bread)
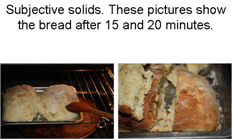
Students will have discovered from their previous activities that dough acts like a solid in some ways, since it does not flow unless a force is applied to it. It does not have a definite shape, nor does it completely take on the shape of the container it is in. It is somewhat rigid but can be made to flow or change shape. However, once it becomes bread, it will have a definite shape and definitely will not flow. The students are likely to know that dough must be baked, or heated in order to become bread and take on its solid form. For this activity, the students will experiment to see how long bread dough must be heated before it becomes solid. They should be given dough and bread (made from the same kind of dough) to touch, look at, compare, and of course write about their observations. Of course, they will want to make the dough into solid bread to eat.
The materials needed for this activity are prepared bread and two identical amounts of bread dough for each group, a knife, a heat-proof spoon, an oven, oven mitts, and a timer. The dough should be purchased or prepared ahead of time. It is important to have at least two identical loaves to observe so that one can be cut after the bread begins to appear solid and cooked, and the other can be cut after the bread is clearly solid and browning. When I conducted this experiment at home, I used a rapid rise white bread recipe and a bread machine to make the dough. The bread cooked quickly and tasted delicious. I examined the bread by pushing on it with a heat-proof spoon. I then recorded the appearance and malleability of the bread at five- minute intervals. After 10 minutes, the bread was still malleable from the outside, though it was clearly not able to flow. After 15 minutes, the outside was fairly hard and light brown, yet the inside was very soft and able to change shape with little force. After 20 minutes, the outside crust was dark brown and hard, and the inside was firm and able to resist moderate pressure.
Before baking, the teacher will ask the students to predict how long it will take to bake the dough and create solid bread. Some of the students may have background knowledge to share with the class in order to help make an educated prediction. Of course, they will also have to agree on what the bread looks like when it has become solid, baked bread, so they will know when to stop the timer and remove the bread from the oven. Once the students have made predictions and written their reasoning in their journals, they will be ready to experiment with baking bread. They will measure and form several equal sized mounds of dough and place them in the oven at the same temperature (after reviewing the need for all variables except time to be the same). The teacher will set the timer and have students check on the dough frequently, at least every five minutes, recording the time elapsed and the appearance of the dough. When the dough has become solid bread, they should remove it from the oven and write about the results of the experiment. Then they may enjoy eating the bread!
Changing Liquids to an Emulsion: Making Mayonnaise
22
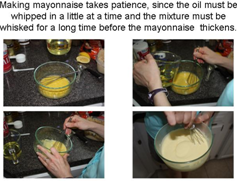
Next, the students will use some common liquids to make a gel- mayonnaise. For each team, the teacher will need to gather 2 egg yolks, 3 tablespoons lemon juice, ¼ teaspoon salt, a pinch of pepper and 1 cup of oil, as well as a large bowl and a whisk. He or she will have the students combine all the ingredients except the oil, noticing the fluidity and viscosity of each of these before mixing. Then, the teacher will instruct students to whisk in a few drops of oil at a time until the mixture is smooth. It is really important to mix the oil into the mixture very slowly. After more than half the oil has been added a few drops at a time, students may add the rest of the oil, still slowly, stirring all the while. Finally, when the oil is completely incorporated, students will use a wire whisk to beat the mixture quickly. If this has been done carefully and mixed vigorously for at least five to ten minutes, the liquids will have turned to a thick yellow emulsion: mayonnaise. The students will record their observations in their journals and explain that the egg yolks hold all the liquids together as one thick, smooth suspension that neither holds its shape like a true solid nor flows freely like a true liquid.
Changing Solid Particles and Liquid to a Gel: Making Jello Fruit Mold
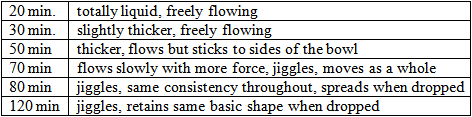
Finally, the students will create a gel using solid gelatin particles and water. This activity will take approximately two hours including data collection. First, each group of students must gather a large bowl, a whisk, gelatin fruit mold mix, cold water, a measuring cup, and a cup of boiling water. The students will predict how long the Jello will take to become a gel and record their predictions in their journals. Then, they will combine the gelatin powder and the boiling water. They will stir the mixture thoroughly with a whisk and then whisk the cold water into the mixture. Students will place the mixture in the refrigerator and make observations every ten minutes until the jell-o has formed a gel. When complete, the jell-o holds together and resists flowing, but does not truly retain its own definite shape when dropped. It will be important for students to write descriptively in their journals about each observation, since the changes will be subtle and gradual. This sample data table shows some results the teacher might expect students to observe.
For an interesting extension, students will be asked to predict what will gel faster when comparing gelatin fruit mold and non-gelatin, vegetarian fruit mold mix made from seaweed. The students will follow the steps of the scientific method to find the results. Please note that non-gelatin fruit mold gels faster than Jello, in about 1 hour, but is slightly less firm than Jello when completely set. Non-gelatin fruit mold mix may be purchased at health food stores or online.