Controlling Bacterial Growth
Antibiotics are chemical substances that inhibit bacterial growth. Living organisms can produce some antibiotics. Other antibiotics are synthesized in the laboratory.
Objectives
Students will learn the basic techniques for culturing bacteria on agar plates. They will also test the effectiveness of certain antibiotics on bacterial growth- and measure the zone of growth inhibition in the presence of antibiotics.
Materials needed
|
·
|
Antibiotic disks (penicillin, streptomycin, tetracycline).
|
|
·
|
Non –pathogenic culture of Escherichia coli
|
|
·
|
Sterile forceps
|
|
·
|
Metric ruler
|
|
·
|
Sterile nutrient agar plates
|
|
·
|
Sterile filter-paper disk
|
|
·
|
Transparent tape
|
|
·
|
Glass-marking pencil
|
|
·
|
Inoculating loop or sterile cotton swabs
|
|
·
|
Safety goggles, aprons, and gloves.
|
|
·
|
A beaker with diluted Clorox bleach (10%) bleach)
|
|
·
|
Bunsen burner
|
SAFETY
-
1-Students must follow the lab safety procedure when performing this lab. All students must wear safety goggles, apron, and gloves. Also they should tie back loose hair.
-
2- Students must clean their lab station and handle their materials carefully.
-
3- Although this bacterial culture is non-pathogenic, students should be careful when they streak the agar plates with the bacterial culture, and make sure that they do not re-open the plates after they are inoculated with bacteria, closed and taped.
Consult and follow the safety guidelines of your institution.
Procedure
|
1-
|
Use a glass –marking pencil to mark the bottom of a sterile petri dish. Divide it into four quadrants and label each quadrant as follows:
|
-
Quadrant one: control
-
Quadrant two: Penicillin disk
-
Quadrant three: Streptomycin disk
-
Quadrant four: tetracycline disk
-
Make sure that you write your initials and the date near the edge of the dish.
-
|
2-
|
Insert a sterile cotton swab into the bacterial culture; return the bacterial culture to the test tube rack.
|
|
3-
|
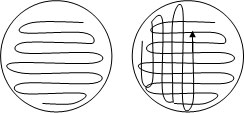
Open the sterile agar plate slightly, and place the tip of the cotton swab on the top center of the agar and streak the agar in a back and fourth motion until you cover the entire plate as shown in the Fig. Be careful not to dig deep into the agar.
|

|
4-
|
Place the cotton swab in the beaker with the diluted Clorox bleach.
|
|
5-
|
Use a sterile forceps to pick up the penicillin disk and carefully place it in the center of quadrant 2.
|
|
6-
|
Pass the forceps back and forth through the flame of a Bunsen burner several times to sterilize the forceps. Be careful to not lean toward the Bunsen burner.
|
|
7-
|
Repeat steps 4 through six with the remaining antibiotic disks in quadrants 3 & 4, and remember to sterilize the forceps after each step.
|
|
8-
|
In quadrant 1, place a filter –paper disk soaked in distilled water.
|
|
9-
|
Use transparent tape to tape the petri dishes closed. Turn the dishes upside down and incubate them for 48 hours at 37
0
C
.
|
|
10-
|
Observe the petri dishes after 48 hours. Hold the dishes to the light to see the zone of inhibition clearly.
|
|
11-
|
Use a metric ruler and measure to the nearest millimeter the size of the clear zone around each antibiotic disk.
|
|
12-
|
Record your data in the following table. If there is no inhibition zone, record the measurement as zero.
|

Give the petri dishes to your teacher for proper disposal.
Performance Assessment
I. Analysis questions
|
1.
|
Why do you think it is very important not to open the sealed petri dishes?
|
|
2.
|
What was the control in this experiment? Why is it significant to use a control?
|
|
3.
|
Which antibiotic disc was most effective in inhibiting the bacterial growth? Why?
|
|
4.
|
Compare the colonies in each quadrant, and record your observations.
|
II. Lab report
Students will write a complete lab report for the experiment. They will be graded according to a scoring rubric.