Lesson 1: What is Energy?
Objective: Students will be able to define what energy is. Students will determine where energy sources originate from. Students will be able to provide multiple examples of when energy is being used.
Essential Questions: What is energy in your own words? Where did the energy originally come from to move the car?
Procedure Day 1:
|
1.
|
Complete a K W L chart. Ask students to write down two things that they know about energy on a sticky note. Have students choose one of the two things that they know for sure to be true. Allow students to walk up to the board and place one of their notes on chart paper. Students will then write two things that they want to know about energy. Students will choose the one thing that they think is most relevant to the topic of energy. Students will walk up to a second chart paper and place one of their notes on the second chart paper
|
|
2.
|
Arrange the sticky notes in a logical manner by categorizing them based on similarities. For example, if a few students wrote sticky notes that have something to do with the sun, then place those notes in a column under the word sun.
|
|
3.
|
Once categories are beginning to be established, discuss with students places that some notes can go. Promote discussion by having students turn and talk to justify their thinking.
|
|
4.
|
Once all ideas are in categories, read through each sticky note. If there are any ideas that students want to know about that are also answered in the section things students know, bring this to students attention. Otherwise, tell students that the things they want to know more about will be answered in the next few weeks.
|
Procedure Day 2:
|
1.
|
Explain that energy can be seen all around us at any moment. Show students four different examples of energy. (Examples of showing energy can be modified depending on what the teacher has in the classroom.) Show the movement of a modeled car and push the car with your hand. Explain that they energy from your body was transferred to make the car move. Have students draw a picture of what happened and write move or change below the picture depending on what the energy did to the vehicle. Put ice under a heat lamp and show students how energy can change the ice from a solid to a liquid. Have students draw a picture of what happened and write change or move under the picture. Wind up a rubber band powered car and place the car on the ground. Let the car move across the room. Ask students if the energy moved or changed the car. Have students again draw a picture and label it. Put a pencil into a sharpener (hand powered or electric). Have students explain what happened to the pencil. Let students again draw the picture and label the drawing.
|
|
2.
|
Promote discussion about what energy is by using the four examples previously displayed. Ask questions like "where did the energy come from to move the first car?" and "what was the same about the two cars and what was different?"
|
Assessment: Students will be assessed on their responses to the essential questions.
Lesson 2: Renewable and Nonrenewable Energy Sources
Objective: Students will compare and contrast renewable and nonrenewable resources. Students will identify renewable and nonrenewable energy sources.
Essential Questions: Why should renewable resources be used as an energy source? What is the difference between renewable and nonrenewable energy sources? What is the same between renewable and nonrenewable energy sources?
Procedure Day 1:
|
1.
|
Introduce the lesson by holding up a picture of fossil fuels, water, and plants/trees. Explain that the earth has many resources that we use every day. Students should have a lot of knowledge about all the resources we use except for fossil fuels. Explain that fossil fuels are plants and animal matter that has been pressurized from the earth and is now drilled out of the ground and used as energy. Then ask students why and when they use water and plants during the day. Have students generate a list of what each resource can be used for.
|
|
2.
|
Group students into four categories. One group will represent plants, one group will represent fossil fuels, another group will represent water, and the last group will represent people.
|
|
3.
|
Pass out colored popsicle sticks to the fossil fuels, water, and plants/trees groups. Each group will get ten popsicle sticks that are all the same color. (For example, the water group will get ten blue sticks, the fossil fuels group will get ten brown sticks, and the plant group will get ten green sticks. The people group does not get any popsicle sticks.)
|
|
4.
|
Read through the resources play (See appendix A). The play will have the people group act out a typical day of a student and all the resources they use in one day. As the person in the play uses a resource, have the people group grab one stick from that resource group. As the person in the play gives back to the resource, have the people give back a stick to the resources.
|
|
5.
|
By the end of the play, students should see how often fossil fuels are used and are not quickly replenished.
|
|
6.
|
End the lesson with a discussion of which resources can be sustained and which are not sustainable
|
Procedure Day 2:
|
1.
|
Post or draw pictures of the following energy sources at work: water, fossil fuels, wind, and solar.
|
|
2.
|
Break students into small groups and have them decide which sources are renewable and which sources are nonrenewable. Have students discuss the difference between renewable resources and nonrenewable resources.
|
|
3.
|
Bring the class back together to share which resources are renewable and which are nonrenewable and what the difference is between the two types of resources.
|
|
4.
|
Have students make predictions using the picture clues of how each resource is harvested to create energy.
|
|
5.
|
Make an anchor chart showcasing how each source is harvested. Explain how a dam, turbine, solar panel, and a power plant collect the energy from each source and transform it into electricity that we can use.
|
Assessment: Students will be assessed on their response to the essential questions.
Lesson 3: Pros and Cons of Energy Sources
Objective: Students will research one of four energy sources. Students will determine pros and cons of one out of four energy sources. Students will share their information with group members. Students will determine which energy source will create a sustainable future.
Essential Questions: What energy source will create the most sustainable future? Why is this energy source the most sustainable?
Procedure Day 1 and 2:
|
1.
|
Put students into heterogeneous groups of four students. Make sure that students will be able to support group members with reading abilities and technology abilities.
|
|
2.
|
Each group member will be responsible for researching one energy source.
|
|
3.
|
The students will be responsible for finding out information about their energy source and sharing it with their group member.
|
|
4.
|
The research will cover: determining if the source is renewable or nonrenewable, the cost of the source, and the environmental or community effects of the source. They will categorize their findings into a pros and cons T-chart.
|
|
5.
|
They will begin by using books and will continue electronically with websites (see student resource list).
|
|
6.
|
Students will end this week by sharing with their group members so that they can all compare and contrast each source. They will then decide which source will create the most sustainable future and explain the reasons why this is true.
|
-
Assessment: Students will be scored on the research they completed. The research will be scored with a rubric. Students will also be scored on their analysis of which energy source will create the most sustainable future and why.
Lesson 4: Energy in your Home
Objectives: Students will rank appliances in their home based on their energy usage.
Students will identify which energy source currently powers their home, and which source should be used to power their home. Students will create a timeline of how this energy source can be transported to their home.
Essential Questions: How do you know what appliances use less energy? Why is it important to use as little energy in your home as possible? What is the most efficient way to transport energy to your home?
Procedure Day 1:
|
1.
|
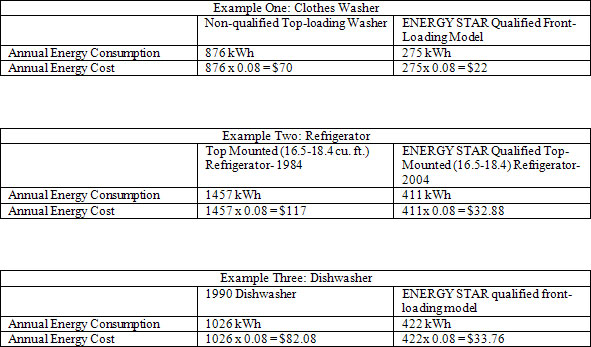
The teacher will hold up a picture of the energy star logo and explain to students that appliances all need different amounts of energy when they are being used. Explain that energy is measured in kWh, kilowatt hours. Explain that some appliances have this energy star logo and it means that they use considerably less energy. Compare ENERGY STAR quality appliances with older nonqualified appliances. (See Figure 1.)
|
|
2.
|
Students should turn and talk about why it is important to use new ENERGY STAR appliances.
|
|
3.
|
Students will be given a copy of OTPCO's energy usage chart. (See Appendix B.) They will look at each type of appliance and its kWh to determine which appliances use the most energy. Students will turn and talk about why some appliances use more energy than other appliances.
|
Homework: Students will walk around their house and list all appliances that are plugged in and being used. They will decide if the appliance is used more or less often and then will calculate how much energy their home uses per year using the energy usage chart. They will calculate the yearly cost. They will also interview their parent/guardian to find out what company and energy source supplies their home with energy.
Assessment: Students will be scored on the research they completed. The research will be scored with a rubric. Students will be scored on calculating the cost of their homes' current energy usage and costs.
Figure 1. This table shows the difference between a nonqualified top loading clothes washer and an energy star qualified front loading model. Both are the same size washer. Notice the difference in price based on a cost for electricity of $0.08 per kWh. More information can be found at http://www.oee.nrcan.gc.ca/residential/business/manufacturers/dollar-savings.cfm?attr=12.
Procedure Day 2:
|
1.
|
Review students' homework and have students share the amount of energy their home was using last night. Have students explain why some homes used more energy and why some homes used less.
|
|
2.
|
Allow students time to share what energy source their parents use to power their home.
|
|
3.
|
Pass out cards with one part of the fossil fuels power plant timeline. Each part of the timeline would say one way that fossil fuels travel from the plant to a home. The timeline would include intermediate steps like power plant, transformer, and power lines.
|
|
4.
|
Have students work in groups based on how many intermediate steps the teacher includes in the timeline. The more intermediate steps and details that are included, the more difficult the timeline will be.
|
|
5.
|
Each group will talk together and figure out the order of the timeline for fossil fuels transporting to a home.
|
|
6.
|
Answers should be given to the whole class to correct any errors.
|
|
7.
|
Students will go back with their researching group from lesson three and make a timeline of how the energy source they chose in week three as being the most sustainable begins and ends at their home. They will use information learned in all lessons, the books from week three, and the websites from week three to make their timeline. Their timeline of images should mimic the one the teacher made.
|
-
Assessment: Students will be assessed on their homework and their timeline of their energy source transportation. Students will also be assessed on their response to the essential questions.