The Design Process
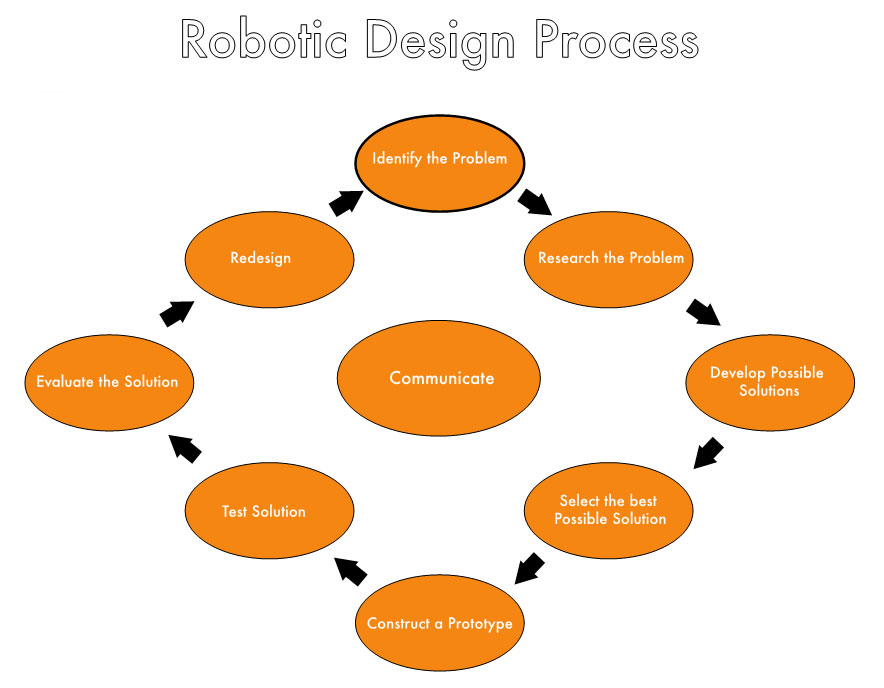
The Design process is an order in which students will look at the different problems they are faced with in the robotic course. It is a series of questions that when each is answered it will allow the student to move on to the next question and in the end hopefully solve the problem. However, if a student is unable to solve the problem they go back to the beginning, thereby allowing the student to ultimately solve the problem. Depending on time constraints, students who solve the problem are able to make it even better by going through the design process again. Consider the diagram below:

In order to collect students’ thoughts and ideas, along with improving their writing, they will complete a design report, which has a series of guiding questions that accompany the design process in order to help students develop possible solutions.
The basic idea of the design process is used in all areas of manufacturing. If not we would still be driving the original Model A Ford or using the first cell phone. The design process can solve a problem or need, but it also allows the developer an opportunity to look at it again and identify what could make it better. The figure below is an example of the design report that I use in my classroom. I work in a computer lab and have chosen to use an almost entirely digital format with student work. I have uploaded this to our servers, and have students save it to their emails or Google doc so they will always have a blank report to use. When students start a project they rename the doc and save it to create a doc for this project while leaving them with the original for future assignments.
Identify the Problem
What is the Problem?
Research the Problem
Are there previous solutions for this problem? Are there similar problems that were solved, if so how was it solved?
Develop Possible Solutions
Explain the solutions and how they will work. Include pictures of sketches and graphic organizers?
Select the best Possible solution
What is your solution? Why is this the best?
Construct a Prototype
Include picture of completed Prototype.
Test Solution
Take notes and/or video for your records.
Evaluate the solution
What worked well and why? What did not work well? What can be changed to make this better?
Redesign
We will walk through a simple problem to help explain how the design process works. For explanation the problem will be that our client hates tying their shoes in the morning and when they do the laces come undone.
Identify the Problem
What is the Problem?
Our client hates tying their shoes in the morning, and when they do the laces come undone.
Research the Problem
Are there previous solutions for this problem? Are there similar problems that were solved, if so how was it solved?
Our client wears dress shoes, the shoes are leather and the laces are cotton. Other previous solutions can be found with Velcro shoes and slip on shoes.
Develop Possible Solutions
Explain the solutions and how they will work. Include pictures of sketches and graphic organizers? Velcro shoes are used predominately with children who have not yet learned or are not yet able to tie their own shoelaces. Adults who may have lost their fine motor skills to tie their shoes can also wear them. Another solution that already exist are slip on shoes, they can be found in different styles such as a dress shoe, boat shoe, loafers, and canvas type of shoes.
Select the best Possible solution
What is your solution? Why is this the best?
The type of event your client is attending will determine what they will wear. For normal everyday use the slip on style might work well, but for a sport or activities the Velcro might hold onto the foot better.
Construct a Prototype
Include picture of completed Prototype.
Test Solution
Take notes and/or video for your records.
Evaluate the solution
What worked well and why? What did not work well? What can be changed to make this better?
The slip on shoe worked great for everyday use but not for activities. The Velcro shoe worked for both regular use and for activities. The Velcro was not the best at holding up to the activities, and a suggestion was to have straps similar to skiing or snowboarding boots.
Redesign
In the end with this simple problem, we did not create anything that was completely original, and most of the time the solutions or pieces created for the solution will not be completely original, but it helps students better understand what they are doing. Also, many solutions have both a positive and negative aspect. For instance, with bridges it make be easier and cheaper to produce a drawbridge then a higher suspension bridge to let ships through. However, in the long run the drawbridge will require maintenance, a person to control it, and will also affect traffic flow while it is raised.
How a battery works
A battery has three essential parts, an anode that is the negative side (-), the cathode that is the positive side (+), and the electrolyte that is located in between. Batteries work because of chemical reactions that occur. There is a buildup of electrons at the negative anode where oxidation occurs. At this point there is an imbalance between the amount of electrons on each side, anode and cathode. The electrons flow to the cathode where reduction occurs, which is why it is the positive side. The electrolyte in the center of the battery prevents the electrons from going directly through the battery from anode (-) to the cathode (+). Only ions can flow within the electrolyte.
Attaching a wire connecting the cathode and the anode creates a circuit, and electrons will travel from the anode (-) through the wire to the cathode (+). This is how electrons flow through a circuit. If a light bulb is connected in between the anode and cathode, then the electrons flowing through the circuit will power the light bulb and it will light up. In order to turn on the bulb when needed, a switch can be added to the circuit. When the switch is open, the flow of electrons from the anode (-) to the cathode (+) is stopped. When the switch is closed (referred to as a closed circuit), the electrons will flow from the anode (-) to the cathode (+), thereby powering the light bulb.
Types of batteries
There are two types of batteries, disposable and rechargeable.
Disposable Batteries:
Zinc- chloride Batteries:
This batteries are dry cell batteries, as there is no liquid inside to spill. There is a jelly or paste of ammonium chloride (NH
4
Cl). These tend to be the least expensive batteries.
Alkaline Batteries:
Manganese(IV) dioxide (MnO
2
) and water are converted into manganese(III) oxide (Mn
2
O
3
) and hydroxyl ions (OH
-
). Hydroxyl ions react with zinc (Zn) to form zinc oxide (ZnO) and water. This releases electrons, which move towards the carbon rod and flow through the circuit producing electric current. The battery stops working when the supply of manganese dioxide is used up.
Button Cells:
These are small batteries used in watches, calculators and hearing aids. The top of the battery is negative electrode made from powdered zinc which is trapped between two metal layers. The bottom is positive electrode made from mercury oxide (HgO) and graphite (C). The center is alkaline electrolyte of potassium hydroxide (KOH). In the process of creating electricity, the zinc loses electrons (is oxidized) to become zinc oxide, and the mercury oxide gains electrons (is reduced) into metallic mercury (Hg).
Rechargeable Batteries:
Nickel Cadmium:
At one point all rechargeable batteries were nickel-cadmium (NiCd). These needed to be fully discharged before they could be recharged to their full potential. They also contained very toxic metals inside. If they were not disposed of properly by being recycled, the toxic cadmium could discharge into the soil polluting the soil and nearby waterways.
Lithium-ion Batteries:
These batteries are the most commonly found type in devices that use rechargeable batteries such as cell phones, tablets, and laptop computers. These batteries can store twice as much energy as the nickel cadmium batteries. They can also work longer, and are more environmentally friendly. When these batteries are plugged into a power source the battery wants to store as much electricity as possible. A chemical reaction that changes lithium ions (Li
+
) to become positively charged, shifting them from one part of the battery to another part. When the device is unplugged from the power source, the lithium ions in the battery changes back to negative charge and reverses, the ions to move to the opposite direction, and the battery begins to lose its charge. One drawback of Li+ batteries is that then can over heat and cause fires. The lithium ion batteries have become more advance and are much safer. However, if they are not properly handled or properly manufactured this could be a problem.
Accumulators:
These are car batteries made of a lead-acid accumulator containing three or six cells inside. The cell contains lead (Pb) electrodes and electrolyte of sulfuric acid (H
2
SO
4
) and water. The sulfuric acid is slowly turned into water; the lead electrodes are converted into lead sulfate (PbSO
4
). Passing a current in the opposite direction can recharge the battery. They have the ability to provide very high currents for a short amount of time, which is needed when starting a car, particularly during winter.
Battery terminology and vocab
Voltage:
The electric “force” (also known as electromotive force) that electrons feel when moving from the negative to the positive end of the battery. In lower voltage batteries, there electrical “force” produced than a battery with higher voltage. If you have a device that uses two 1.5 volt batteries in series, then it will have a combined voltage of 3 volts.
Amps:
Also known as ampere is the measure of electrical current. This is the number of electrons that are flowing through a circuit within a specific time frame.
Capacity:
The measure of ampere hours that the battery can supply a specific amount of electrical current before its voltage drops below a certain threshold which will mean the battery is unable to run the device. So if a battery is rated at one ampere-hour this battery can continuously supply one ampere of current for one hour before it is exhausted
Power density:
This describes the amount of power a battery can deliver per unit weight. Engineers are trying to make batteries smaller and thinner without decreasing their power density.
Energy Density:
This describes how much energy a battery is capable of delivering, divided by the battery’s volume or mass. This is important for knowing how long can a cell phone last before needing to be charged, or how far/long can a robot travel before having to be recharged. This attribute is particularly relevant to the devices we use in our everyday lives because it determines how long a cell phone can be used between charges, for example.
History of the battery
Below is a timeline along with brief information regarding those years. Depending on the teacher’s schedule, they can research specific years in more detail and also collect information from students in the history activity and lesson of this unit.
In 1748 Benjamin Franklin coined the term Battery to describe an array of charged glass plates.
1780 to 1786 Luigi Galvani, his research has helped future inventors such as Volta.
1800 Voltaic Pile invented by Alessandro Volta, this was one of the first methods to produce electricity.
1836 Daniell Cell invented by John F. Daniell it was a battery that produced 1.1 volts and used to power objects like doorbells, telegraphs, and telephones.
1839 Fuel Cell invented by William Robert Grove it produces electricity by combining hydrogen and oxygen.
1839- 1842 Liquid electrodes where used as an improvement to create batteries.
1859 Rechargeable, Gaston Plante developed a lead acid battery that could be recharged.
1866 Leclanche Carbon Zinc Cell, George Leclanche patented the carbon zinc wet cell battery.
1881 J.A. Thiebaut patented the first battery with a negative electrode and porous pot that was placed inside a zinc cup.
1881 Carl Grassner invented the first dry cell battery that was available commercially.
1899 Waldmar Jungner invented the first nickel- cadmium battery what was rechargeable.
1901 Alkaline Storage Battery was invented by Tomas Alva Edison.
1949 Alkaline Manganese Battery developed by Lew Urry while working for Eveready Battery Company.
1954 Solar Cells invented by Gerald Pearson, Calvin Fuller and Daryl Chapin. This converts the sun’s energy into electricity.
1964 Duracell was incorporated.
Classroom Activity
After introducing the different types of batteries and before explaining their uses. Partner students up using your favorite method, think pair share, etc. Once students have partners, assign each group a different type of battery. Have students find out as much information regarding that battery as possible. This can include, but is not limited to when it was developed, how it works, what devices use that type of battery, what are its pros and cons, etc. Students will prepare an informal presentation for the class. This presentation can be done with any resources available in the classroom. The students can make posters, or some form of slide show using the software that is available. The presentation should have some type of visual content. This assignment would be introduced, partnered up, worked on, and completed in one 87-minute class period. The students will share their presentation with the class during the following class period. Once the presentation is over the teacher will provide an overview of the different types of batteries and fill in any missing information.
Classroom activity
After showing the blank timeline to the students, assign each student a year and continue repeating the years until all students have a year assigned to them. Have the students conduct research on their year to determine the significance of that year for the field of batteries. Once students conduct a small amount of research, have then form groups with classmates who have the same year and share their findings. Once this is complete, have each group describe what they have found. This can then be combined in a classroom timeline that can be posted for this unit.
Classroom experiment
For this experiment we will test out the efficiency and power of different battery brands.
Supplies needed:
Cardboard box (we will use empty paper boxes from our school)
Video camera with stand or small tripod
Light bulb
Watch with date and time
Different brand and quality batteries
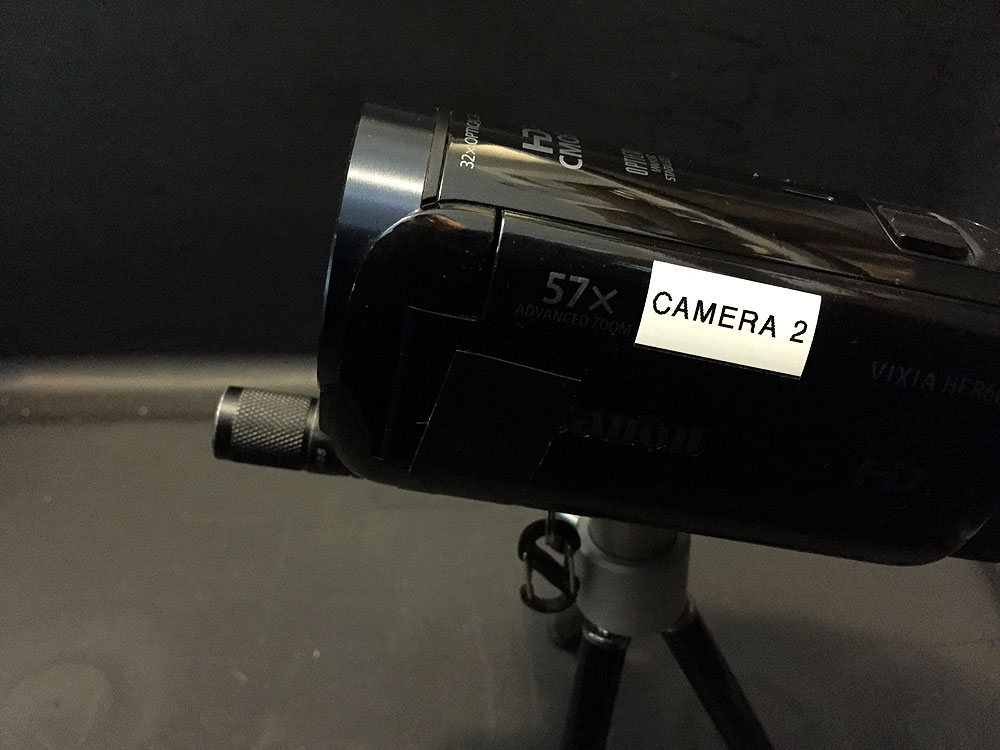
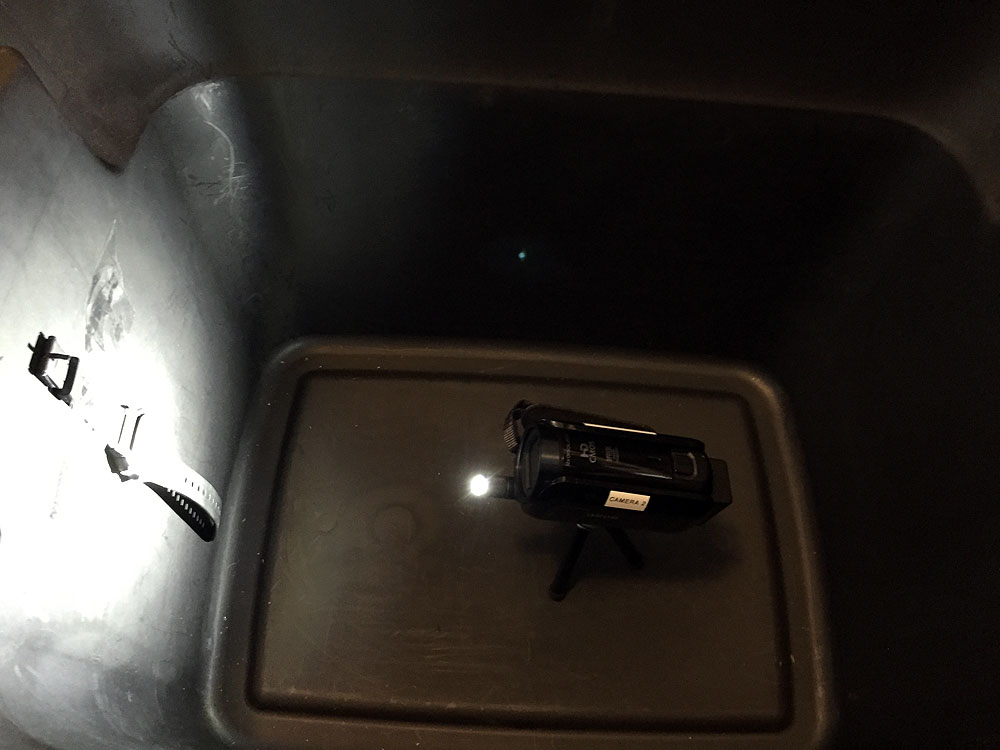
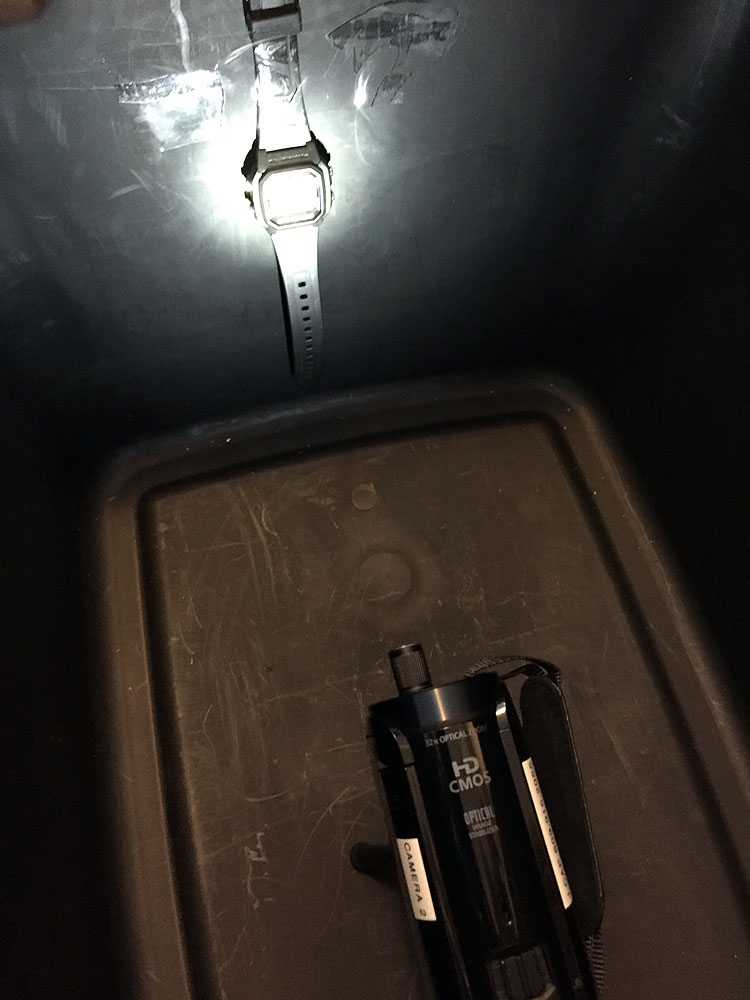
The watch will be attached to the wall of the box. The flashlight will illuminate the watch such that it can be read from the video footage taken. The video camera will be set to record the watch on the side of the box. The video camera settings will be set to time-lapse mode. Once this is set up, a battery will be chosen for the flashlight which will be placed in the box. This experiment can be set up on the first day of this unit and then continue until the battery is dead.


Once the battery is dead, the footage can be reviewed and the students can see at which point time that they were last able to view the watch using the flashlight. If they want to determine the exact time that the light went out completely, they can calculate the time from the footage. Students would fast forward through the video to see when the watch was last visible as the battery begins to die. If the watch is last visible at 12:00 pm, the students would fast forward the video from that point until it is completely dark. They would then know how long video footage was recorded from the time of 12:00 pm to complete darkness. So, for example, if this time is five minutes, then the students can add five minutes to 12:00 pm to determine that the exact time the light went out completely was 12:05 pm. Depending on the classroom resources. A different box could be set up for each brand of battery. A wide shot could be made with all the brands in the same box.
As single set up could be used, and then after each battery is dead, a new test could begin.
Another box could be set up with a LED flashlight parallel to the last experiment. The teacher should have an idea of the time the light can be powered to make sure it is not too long. This will demonstrate that a LED light with perhaps the same luminosity and same battery will remain bright for a longer amount of time. If there are additional resources available, the same construction of a box and video camera set up could be used. If not, it could be checked on daily, and after the first experiment is completed the video equipment can be transferred to this lighting experiment.
Classroom experiment
For this experiment we will put several batteries through a series of stress/endurance tests. We will take different batteries and expose them to extreme conditions. Some batteries will be frozen for a given period of time, some will be exposed to extreme heat, and one battery will be put in storage to see the effects of time on an unused battery. Once these batteries are exposed to the heat, cold, or time, we will test how these conditions affect the batteries’ performance. These batteries can be tested using the same method as before for the tests of different brand.