The Design Process
Objective: Students will be able to use the template provided below to problem solve any given problem and document their research, testing, sketches and pictures in an organized way.
Rational: This class is project based with an emphasis on problem solving and trial and error with each of the projects. From past experience, I know it is hard for some students to get started on their project when it is introduced as an open-ended problem. As students start to work on their design, it is often hard for them to realize their project may not be going in the right direction, so they need to start over or change their original design. Students who complete their project don’t always look at ways to improve their original design to make it better, whether it is more efficient or consistent. After reflecting on previous project outcomes, I wanted my students to reflect on their designs and think of how they could be improved and also how they could use the information they learned throughout this project to assist them with future projects and problems in and out of school. This is when I developed the design process that we use in class. Adding the guiding questions with the order of the design process helps students with their answering of the questions and documenting their work. It also helps students get started with the project as opposed to looking at a difficult problem and not knowing where to begin. Below is a detailed look at a problem being solved with description.
This lesson will be taught and reviewed with students for one class period because this class will use this format through out the year for most of the projects. It is important that they understand the formatting and process that will be used. The more the design process is understood, the easier future projects will be to complete and find the solution and improve solutions in the future.
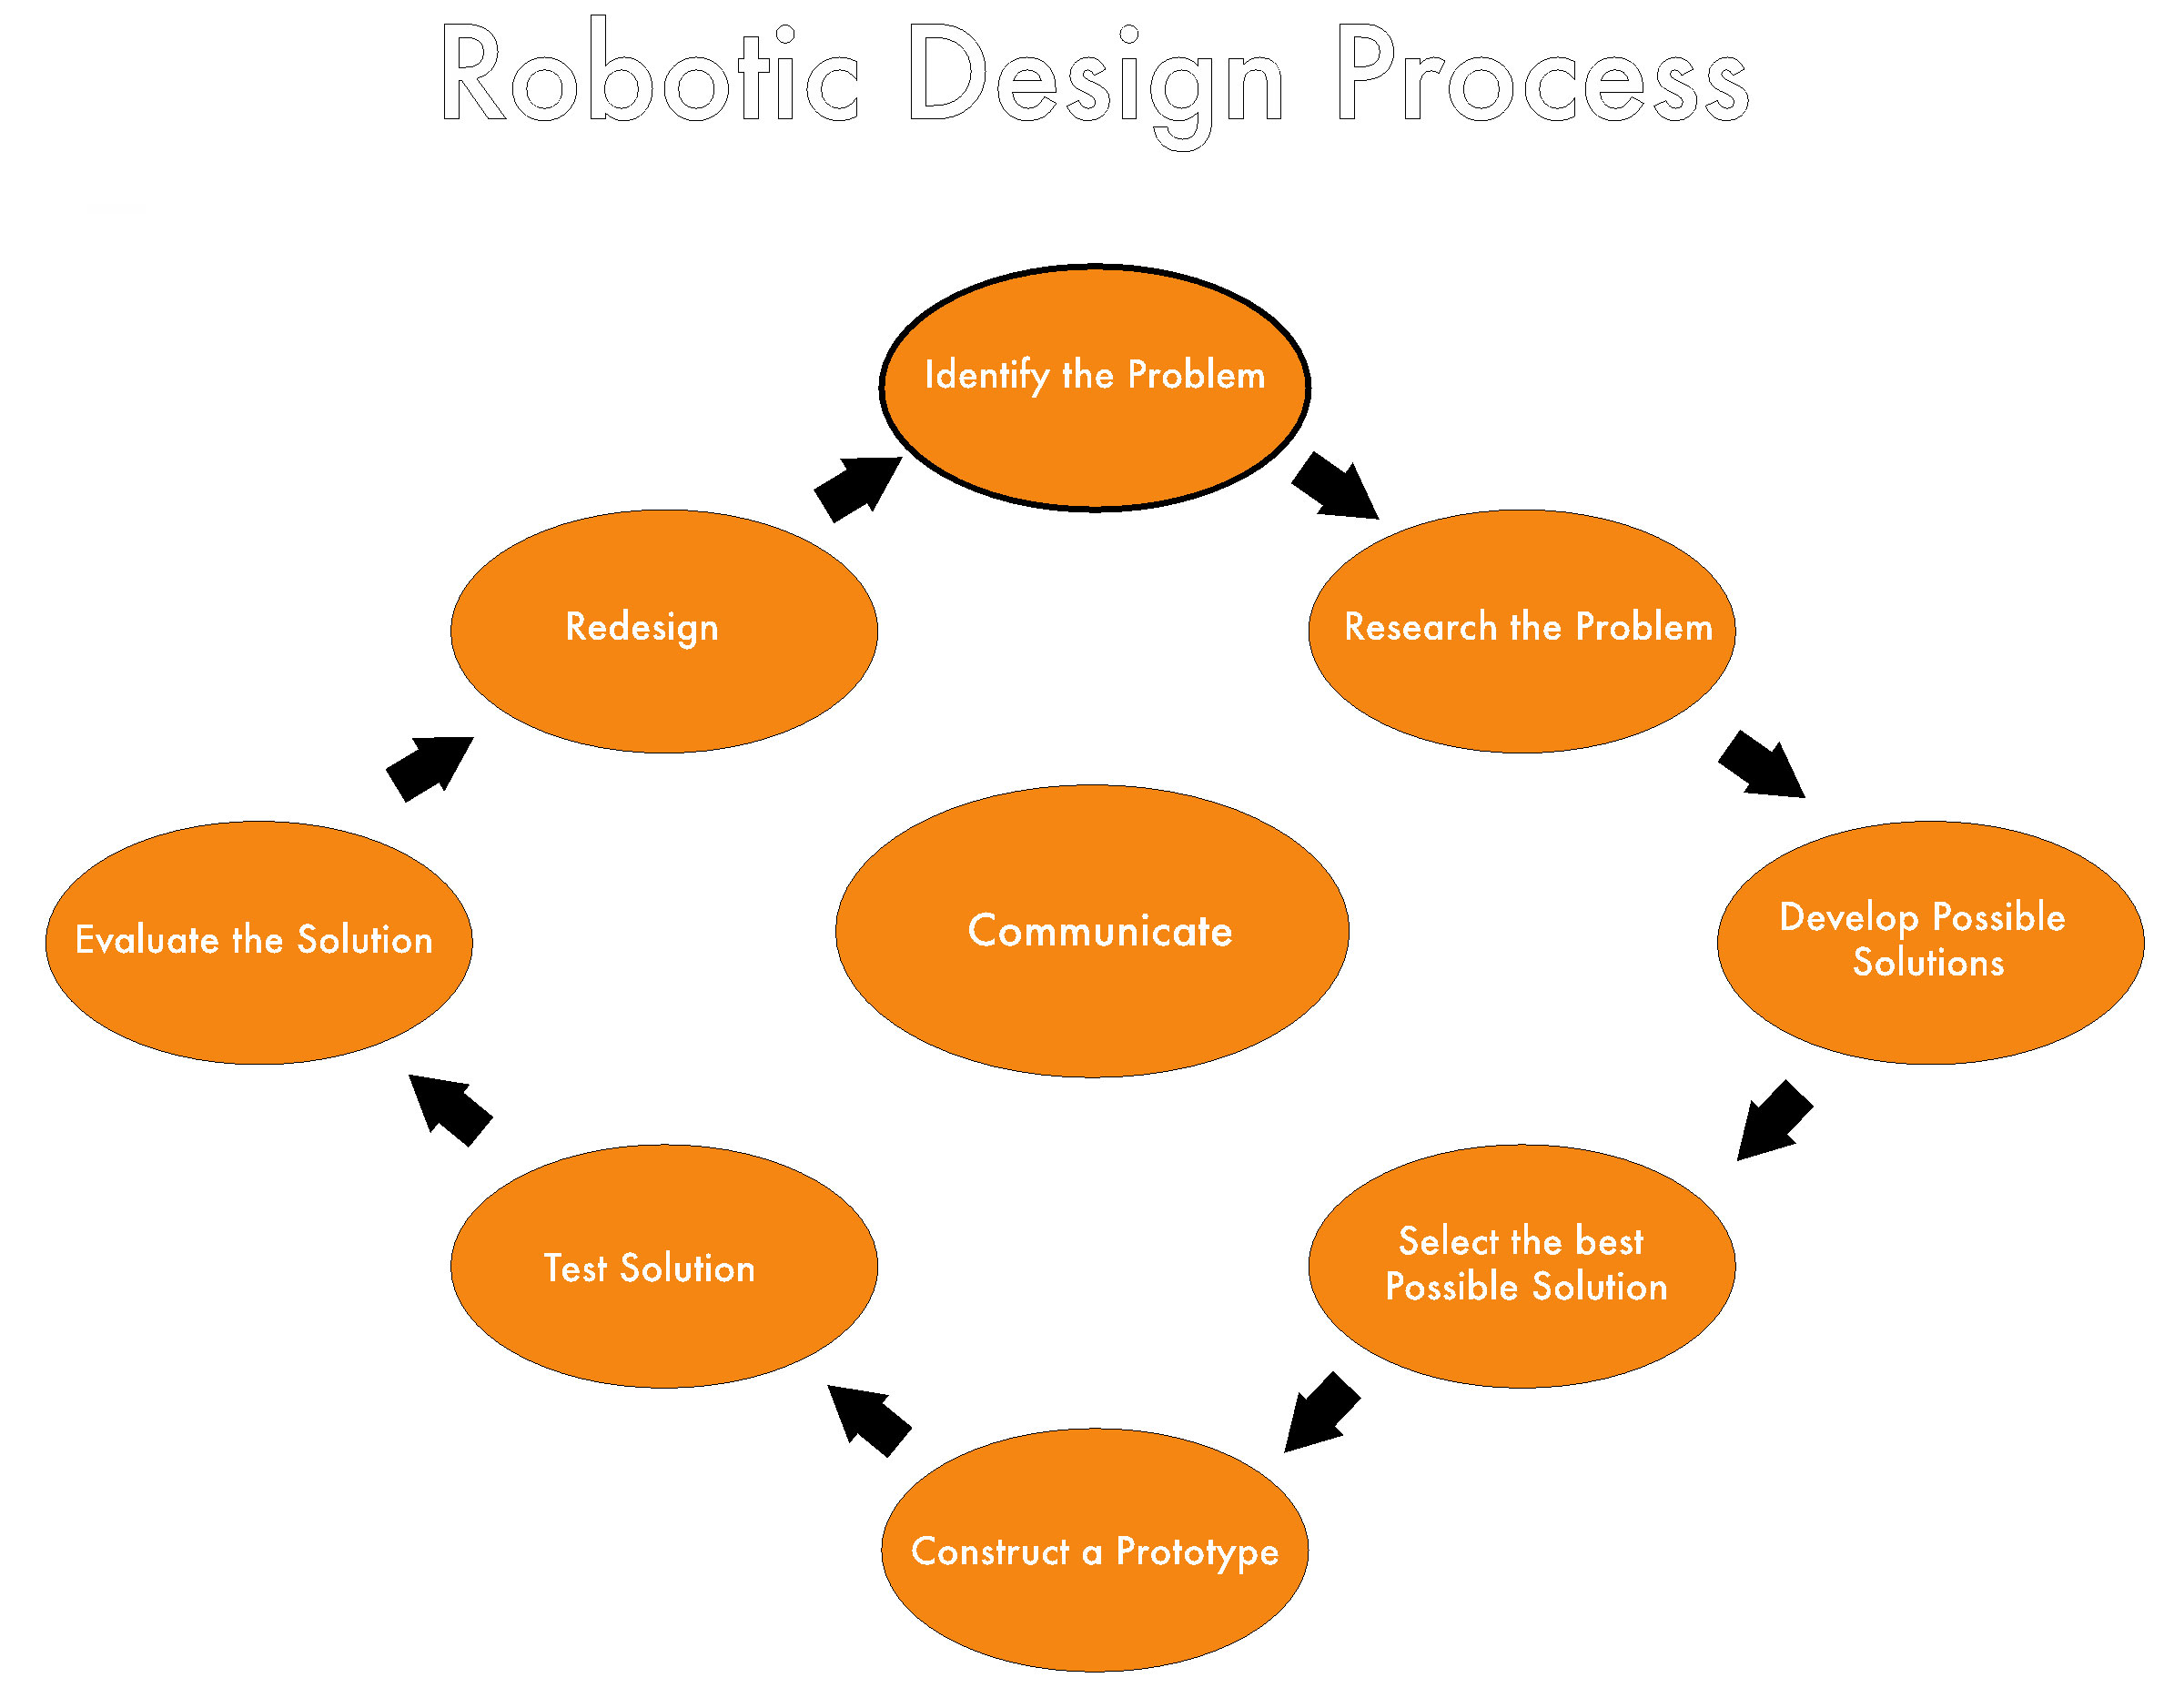
The design process is an order in which students will look at the different problems they are faced with in the robotic course. It is a series of questions that when each is answered will allow the student to move on to the next question, and in the end, hopefully solve the problem. However, if a student is unable to solve the problem, the questions go back to the beginning, which allows the student to solve the problem in the end. Depending on time constraints, students who solve the problem are able to make it even better by going through the design process again. Look at diagram below:
In order to collect students’ thoughts and ideas, along with improving their writing, students will complete a design report, which has a series of guiding questions that go along with the design process, in order to help students develop possible solutions.
The basic idea of the design process is used in all areas of manufacturing. If it wasn’t, we would still be driving the original Model A Ford and using the first cell phone. The design process can solve a problem or need, but it also allows the developer a way to look at it again and say what could make it better? The figure below is an example of the design report that I use in my classroom. I work in a computer lab and have chosen to use a digital format for student work. I have this uploaded to our servers, and I have students save it to their emails or Google document, so they will always have a blank report to use. When students start a new project, they will rename the document and save it creating a new document for the project, while leaving them with the original document online for future assignments.
Identify the Problem
What is the Problem?
Research the Problem
Are there previous solutions for this problem? Are there similar problems that were solved, if so how was it solved?
Develop Possible Solutions
Explain the solutions and how they will work. Include pictures of sketches and graphic organizers?
Select the best Possible solution
What is your solution? Why is this the best?
Construct a Prototype
Include picture of completed Prototype.
Test Solution
Take notes and/or video for your records.
Evaluate the solution
What worked well and why? What did not work well? What can be changed to make this better?
Redesign
We will walk through a simple problem to help explain how the design process works. For example, the problem will be that our client hates tying their shoes in the morning, and when they do, the laces come undone. This is a fictitious example used to show the teacher and/or student how this design process will help figure out and solve a given problem. The response is used to help illustrate the kind of details and answers the students will use in their response.
Identify the Problem
What is the Problem?
Our client hates tying their shoes in the morning and when they do the laces come undone.
Research the Problem
Are there previous solutions for this problem? Are there similar problems that were solved, if so how was it solved?
Our client’s uses dress shoes, the shoes are leather and the laces are cotton. Other previous solutions can be found with Velcro shoes and slip on shoes
Develop Possible Solutions
Explain the solutions and how they will work. Include pictures of sketches and graphic organizers.
Velcro shoes are used predominately with children who have not yet learned or are not yet able to tie their own shoelaces. It can also be seen with adults who may have lost their fine motor skills to tie their shoes. Another solution that already exist are slip on shoes, they can be found in different styles such as a dress shoe, boat shoe, loafers, and canvas type of shoes.
Select the best Possible solution
What is your solution? Why is this the best?
Depending on the type of event your client is attending will determine what they will wear. For normal everyday use the slip on style might work well but for a sport or activities the Velcro might hold onto the foot better.
Construct a Prototype
Include picture of completed Prototype.
Test Solution
Take notes and/or video for your records.
Evaluate the solution
What worked well and why? What did not work well? What can be changed to make this better?
The slip on shoe worked great for everyday use but not great for activities. The Velcro shoe worked for both regular use and for activities. The Velcro was not the best at holding up to the activities a suggestion was to have straps similar to skiing or snow boarding boots.
Redesign
In the end, with this simple problem that our clients were having, we did not create anything that was completely original, and most of the time, the solutions or pieces created for the solution will not be completely original, but it helps students have a better understanding of what they will do when completing assignments in class. Also, lots of solutions have a positive and negative aspect. For instance, with bridges, it may be easier and cheaper to produce a drawbridge than a higher suspension bridge to let ships through; however, in the long run, the draw bridge will require maintenance, a person to control it, and it will also effect traffic flow while it is up.
History of satellites
Objective: Students will understand the origins of satellites and how they were apart of space exploration. Students will have a better understanding of the how scientists developed something that had never been accomplished before 1957, and how with each additional satellite that went up after, scientists and engineers would improve the design, test out new designs, and record their effectiveness at completing the job.
Rational: In the ever changing technological society that we live in today, it is hard to pinpoint great achievements as they are covered up by frequent small changes. A Smart Phone, for example, is updated throughout the year with small changes and improvements for a better user experience with the software and hardware improvements. It is hard to pinpoint the time when camera phones were developed and then became a norm. In studying and learning the history of satellites, it shows a timeline of different achievements that different countries had, along with allowing the development of other hardware due to the orbiting satellites in our solar system.
Since 1957, approximately 7,455 satellites have reached orbit; now only 950 remain functional. The Cold War accelerated the development and advancement of space technology, and satellites were a part of this movement. On October 4, 1957, the Soviet Union successfully launched the first satellite, Sputnik 1, which orbited the earth in 98 minutes. The Sputnik 1 was about the size of a basketball, weighing in at 183 pounds. Quickly after on November 3, 1957, the launch of Sputnik 2 raised much fear. This was three times as large as the original Sputnik 1, and it carried a dog as a passenger. It was thought that the Soviets would be able to launch ballistic missiles from Europe to the U.S. with their new technology. In 1958, the U.S. launched four satellites. Explorer 1 was launched on January 31
st
, and it was the first spacecraft to detect the Van Allen radiation belt. The Vanguard 1 was launched on March 17
th
, and this was the first three-stage satellite design. It was used to test the capabilities of a three-stage launch vehicle; it also holds the record for being the longest satellite in space at 57 years. The Explorer 3 was launched on March 26
th
, and finally the Score was launched on December 18
th
. The Score was the world’s first communication satellite.
There are a few different types of satellites: LEO- Low Earth Orbit used for observation at 80- 1000 miles. MEO Medium Earth Orbit is used for Navigation 6000 – 12,000 miles. GEO- Geosynchronous Earth Orbit is used for Communication 22,000 miles. HEO High Earth Orbit is used for observation 22,000 + miles.
Classroom assignment: Students will conduct their own research on satellite history creating a timeline with facts they find interesting and would like to share with the class. This can be accomplished by letting the students create a timeline from 1957 to present day. Other ways could including giving each student a two to three year span (depending on the size of the class) to research and find out the things that have happened related to satellites and other space accomplishments.
Once all students have completed this, a round table discussion and sharing will occur, allowing the students to share their findings with their peers. It will allow students to speak and discuss key facts, dates, and accomplishments. The teacher will also participate by adding any information he or she feels is needed, important, or was left out during student research. Once completed, students will submit their timelines. This timeline will be compiled into a larger time line that can be shared with the class. The compilation is up to the teacher’s discretion. This could be formed into large posters that can be displayed in the classroom, or a PowerPoint/PDF can be made and sent out digitally or printed for classroom notes. It can also be posted on a classroom website. This compilation will be review during the opening of following class period.
How satellites work and their relation to robotics
Objective: Students will understand the basic workings behind satellites, their basic design, and how they send and receive information. They will also learn the different uses of satellites and how they assist with communication in various forms from everyday communication to weather and safety alerts to national security. They will also learn how the robotics field is involved with satellite operations and construction.
The definition of robot is a device that automatically performs complicated, often repetitive, tasks and a mechanism guided by automatic controls. The definition of satellite is a machine that is sent into space and that moves around the earth, moon, sun, or planet. Satellites are a form of a robot that is in space. This is another field in which robotics can be seen in use and in the construction process to produce the satellites.
Satellites first must get into space; this is accomplished with the use of rockets and the Space Shuttle, which is a reusable spacecraft. Once in orbit, the earth’s gravity provides a centripetal force. This keeps the satellite in orbit; there are also gyroscopes, which will stop the satellite from spinning off course. Most satellites are powered by solar panels, and some use nuclear power.
While satellites are in orbit, they follow three different routes around the earth: geostationary, geosynchronous, and polar. Geostationary and geosynchronous are used in communication satellites where they will remain at a fixed point on the equator. Geosynchronous satellites will loop around certain points on the equator up to two times per day. Polar orbits are located over the north and south poles, and they are used for remote sensing satellites. They are closer to the earth than the others; they are approximately 150 to 650 miles above earth.
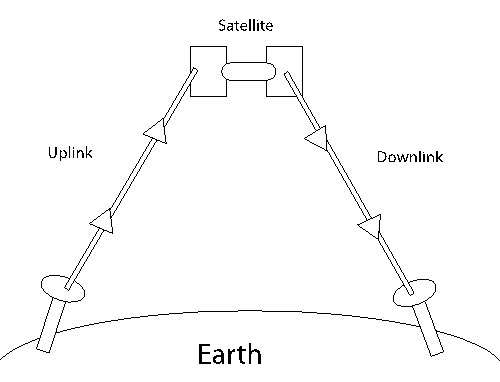
Satellites used for communication receive information and then transmit it down to the receiver in a different location. When the satellite receives information from the earth, this is called the Uplink, and when it sends that information down to the receiver, it is called the Downlink. See Diagram below.
Different types of satellites:
Astronomy satellites: These are telescopes that float in space; they are above the orbit. The images are much more clear because there are no gases that make up the earth’s atmosphere to get in the way. These take pictures of supernovas, quasars, black holes, and other galaxies.
Atmospheric Studies satellites: These satellites study the earth’s atmosphere; they orbit lower than other satellites to accomplish this. These were also some of the first satellites launched into space.
Communication satellites: These allow many types of communication at long distances.
Navigation satellites: These satellites are used to figure out one’s location on the earth. The simplest way of explaining it is that the GSP device sends and receives information from the satellites in orbit to tell its position on the earth. It uses time and distance to determine the location.
Reconnaissance satellites: These satellites are used to spy on other countries and provide intelligence information. There are different types of these satellites; some use optical imaging and light sensors to identify missile launches. Radar imaging is used to pick up radar through cloud cover. Ferret satellites pick up radio and microwave transmissions from a country. The last are relay satellites, which are used to help transmit information faster from point A to point B, such as a spy satellite to the receiver on earth.
Remote Sensing satellites: These satellites can take large area pictures from space, and it can be use to observe and measure the environment. It can track animal migration, locate mineral deposit, and track the speed that the forests are being cut down. It is useful to see areas from over head view of places that are too hard to get to from ground and/or have extreme conditions.
Search and Rescue satellites: These satellites locate emergency beacons; also know as ELT (Emergency Locator Transmitter), which are on ships, aircraft, and individuals in remote and/or dangerous places. Search and Rescue satellites fly over the ELT that are sending a distress signal and calculate the location through mathematical equations and also the Doppler effect. The location is sent to rescue workers, and then a rescue can be conducted.
Space Exploration satellites: They are not technically satellites, but they operate in a similar way. Also know as space probes, these satellites are built to last long periods of time, as it takes a long time for it to leave the earth’s orbit and travel into the deep space of the solar system. It is able to send back data and pictures of faraway planets and other information from deep space.
Weather satellites: These satellites help meteorologist with the weather; they are able to measure many things that can be calculated to learn different things, such as radiation measurements from the earth’s surface can provide information about heat from the earth and its atmosphere.
Classroom assignment: Students will be paired up and pick a type of satellite they are interested in learning more about. Upon choosing, students will conduct research and find out how these satellites are used and what they do. Students will design a poster to present this information to the class and allow it to be displayed for the class. Poster construction can be done using traditional poster board or large paper, or it can be done digitally. Students who take robotics in our school also have taken graphic design, so they will be able to use the computer lab that is in our classroom along with the aid of Adobe Illustrator and Adobe Photoshop to create their poster.
Essential Questions:
What is different for a robotic device in space vs. one on the earth’s surface? Things to consider while answering the questions: the power supplies, materials used, and technology.
Can you identify through research any materials that are used in these designs? Why was this material chosen?
What have satellites allowed us to accomplish so far? Give at least two examples, what do you think they will allow us to accomplish in the future?
Mission: Apollo 2015
Briefing:
NASA needs our help to deliver their newest satellite into a specific area of space. This satellite will allow state of the art communication between smartphones. Your mission should you choose to accept will be to create a robot capable of transporting a satellite to the location in orbit. Should you choose not to accept all text message and social media connection would fail to exist along with your grade. Good luck and may the odds be ever in your favor.
Constraints:
Now that we have learned about the history of satellites, their basic functions and uses it is time to make a simple small model with the supplies provides. Your group will label key features of this model to better learn the parts. Once this model is complete your group will use the design process and fill out a design report to create a robot that is capable of moving the model satellite and transporting it to a different location where it must be places with in a target area. The model satellite must be fully intact and not damage or fall apart during the transporting and placement in the target area. The robot and model satellite may not be engaged before the start of the time and must be fully disengaged at the end. The time will start when the robot crosses the start line and the time will end when the robot places the satellite and fully disengages and leaves the target area. If groups wish to use materials not found in the Vex kit they must ask permission.
The start area will be twelve feet from the target area and the target area will be one square foot. The areas will be taped off on the floor to allow practices runs be for the final due date. You and your partner will have three full class periods before we test and the final design report is due the last after the testing date in form of an email.
During the due date of the test each group will have three trials; groups must complete the task with in two minutes. Failure to do so will affect the grade.
Point System:
Design Report 50 points
Robot Construction 15 points
Construction and label of the Model Satellite 10 points
Landing in the Target area 15 points
Disengagement at the end 10 points
Every second group goes over the two-minute time limit: -1 point for each second over
For every inch of the satellite that is not in the target area: -1 point
Reflection of unit
Objective: Students will reflect on their learning and discussions from this unit. This will include their comfort with the design process, facts that were most interesting to them while learning and researching the history of satellites, and the different uses of satellites.
Rational: It is important as an educator to allow for reflection of students work. It allows the student to process and think about the learning that has occurred and the collaboration that took place. This helps students identify material that they truly understand and material that they would like to work on. By allowing students to think about their strengths and weakness in a safe learning environment, they will become stronger students. The student, along with the teacher, will know if more explanations or learning will be needed in order for the student to move on to new material or advanced material. I, as an educator, also use this time to determine what changes will be needed when teaching this unit in the future. If students all respond that they did not understand something, the next time I teach this unit I will focus more time on that specific topic or material. It also lets me know if the estimated time allocated to classroom lesson or activity was sufficient.
Classroom assignment: You will have the remainder of the class period to answer these questions. If you do not finish, you need to complete it for homework. Please answer these questions in your own words honestly and be as detailed as possible. This information is to help you understand your learning during this unit, and it will help the teacher make it better for the future.
What was the biggest challenge you had while working on the assignments and activities for this unit?
What would you do differently if you were to do this again?
If you had to do the same project but could change it in any way what would you do? (Time constraint, different materials, has longer or shorter time to work on it, etc.)
Do you feel you have a deeper understanding of the design process? Please explain.
Do you feel you have a deeper understanding of the history of satellites? Please explain.
Do you feel you have a deeper understanding of the how satellites work and their uses? Please explain.
Do you have any suggestions for the teacher on how to improve this for the next class?