Jennifer B. Esty
In Howard Gardner’s recent book
Multiple Intelligences
, he gives an example of his theory inappropriately applied, which seems to me to be particularly applicable to this unit. He says:
-
“It leads to situations where teachers say, ‘Johnny can’t learn geometry because he
-
does not have special intelligence.’ To be sure, special intelligence is helpful for
-
learning geometry, but there is more than one way to master geometry; and the
-
challenge facing every geometry teacher is to figure out how to teach students to
-
carry out and understand proofs, whether or not their special intelligence is up to
-
snuff.”
1
This quotation captures the essence of the necessary strategies for this unit. Many students have not mastered the ability, or do not possess the ability, to apply their spatial intelligence to the matter of reading diagrams. Therefore, it is necessary to develop strategies to enhance the student’s latent spatial ability and to help those with weaker special intelligence to develop alternative methods of interpreting the diagrams. What follows in this section are some strategies designed to help students build spatial abilities and to allow students with very weak spatial abilities to slowly develop coping mechanisms or systems which will allow them to interpret diagrams using their own best honed abilities.
As a teacher in a school for pregnant and parenting teenagers, I recognize that my students have special needs. One of my students’ more unusual needs is sleep. All of my students are significantly sleep deprived for long periods of time at some point during their stay in my classroom. This means that it is more difficult for them to develop memory, both long term recall and short term recall. The pregnancy also means that their minds are frequently engaged by things other than my teaching. As a result, I have developed some strategies to help my students cope with this temporary disability. One of the simplest methods I employ is to allow my students to use their notes on any assessment I give, with the restriction that the notes are written in their own handwriting. This restriction helps to reinforce the student’s learning by forcing the student to process the information in the notes several times. It also allows the student to encode the information in a way that works best for them. The first classroom activity also reinforces the idea that students should learn to process information in a way that works best for them.
Finally, I am a logical thinker when difficult tasks are presented. I find that a logical process written in distinct steps makes a complex task easier to perform and easier to teach. When a complex task is broken down into simpler steps and pieces, students generally find it easier to perform, too. So, what I have done in this unit is to break down the complex problem of interpreting diagrams into smaller, more manageable parts to make the concepts easier both to understand and to teach. The particular drawing techniques and books I have chosen all also break down the complex tasks into basic rules and logical steps, which make the complex tasks easier to perform. As a result, the sections of this unit are intended to be used in sequence. The first section, cognitive mapping is intended simply as an introduction to the concept that images in the mind may be connected both to realities of the world and to illusions or illustrations of reality on paper. The concept ought to be mastered by students before the next task is attempted, but the mapping on paper does not have to be perfect before the next task, three dimensional graphing, is attempted. With the possible exception of isometric drawing, the other tasks really ought to be conducted in order with one task mastered before the next is begun. Isometric drawing is a very useful bridge between plan views, which follow the three dimensional mapping, and perspective, but it is not strictly essential if you have a class that picks up on things quickly. If you have a slower class, or a frequently absent class, you may want to seriously consider using the section on isometric drawing before you go into perspective drawing.
Cognitive mapping
Cognitive mapping is a theory which predates Gardner’s work. The work I have used most extensively for this section comes from an anthology compiled by Roger M Downs and David Stea, which was compiled for people working in the fields of urban planning, forestry, and architecture. According to Downs and Stea, “Cognitive mapping is a process composed of a series of psychological transformations by which an individual acquires, codes, stores, recalls, and decodes information about the relative locations and attributes of phenomena in his everyday special experience.”
2
At first glance, this may seem like an odd reference for an anatomy unit, but many of the skills required for urban planning and architecture are also required to understand the anatomy of the human body. A large part of anatomy is the spatial relationship between various parts of the body. The geometries and volumes of the visceral organs, for example, help to explain how they all fit together within the combined space of the abdominopelvic cavity. An anatomy student must learn the name of a particular organ, the organ’s three-dimensional geometry, the organ’s location within the body, and the organ’s location relative to the other organs in the body.
The characteristics of the organ just mentioned are very similar to the characteristics of objects in a physical landscape. For example, when one is traveling over a familiar route, like the route one travels from work to home, certain objects act as cues to know where to turn. These objects have characteristic properties, such as color, shape, location relative to other object, and location relative to other events on the journey. These characteristics can seem different under altered circumstances. For example, on my journey in to school, there are certain places where traffic generally backs up every morning. Near one such place, there is a billboard which seems to catch my eye nearly every day. When I have traveled the same route on the weekend, traffic was not backed up in that spot, so I did not notice the billboard. Thus, the same journey had a slightly different cognitive map on the weekend than it did on a work day. However, many of the essential landmarks at places of significant turns remained the same.
3
The idea of cognitive mapping is especially useful in anatomy when applied to systems which involve a flow of materials, such as the digestive, circulatory and lymphatic systems. Many anatomy books use the metaphorical journey of a molecule or very tiny being through the system to help students understand how the system works. However, there are two basic problems with this approach. First, while the journey as described in the text does generally include the physiology of the organs passed on the “journey”, it does not generally include the physical characteristics of the objects passed on the journey, such as the geometry and color of the organs passed. Second, many students don’t seem to grasp the metaphorical connection between the journey through the body and a journey they might take to school or the corner store., so I have designed a classroom activity which may help them to make the connection.
Downs and Stea state, “We believe that a cognitive map exists if an individual behaves as if a cognitive map exists.”
4
In essence, an anatomy teacher tries to get her students to behave as if they have a cognitive map of the human body. The classroom activity outlined below is designed to elicit such behavior from students.
Classroom Activity
The human body is an amazingly complex set of interrelated systems. Because of the complexity, it is wise to break the body down into smaller systems for study. However, even subsystems can be very complex and also need to be broken down. This activity is designed to start putting the parts of a system back together after the individual organs have been studied, later in the year. I expect to use this activity many times with many of the different body systems as we go through them. At the point in the year where this activity takes place, a student should have a collection of organs with their characteristics in some organized fashion. Most of my students in this class are juniors and seniors, who need to learn to process information on their own in a way that works best for them because they need to be ready for the self-directed learning found in college and careers in the next few years. For me, a table would probably work best because all of the information is laid out in an organized manner, and I find it easier to find the required information. Concept mapping might be a strategy that works better for others, however, and I am sure there are other organizational techniques which would work as well. At any rate, I would like students to be able to devise their own systems based on their own learning styles.
Once the students have collected their information on the characteristics and functions of the individual organs, they need to figure out how the parts work together. So, that is the task of this activity. Students will be asked to develop a cognitive map of the organs in the system, which they can share with the class. The idea is that the students will come up with a way that will help them remember how the organs fit together and work together. By sharing their techniques with their classmates, they will give their classmates another way to remember information. I foresee a number of different cognitive map presentations, which might include visualized journeys, a list of steps, a rap, a song, a chant, an acronym, a conversation, or a dance or other type of movement. However, I also expect that my students will surprise me. The major restriction on this project, though, will be the requirement that students have notes of some sort to reference during the standard assessment for the chapter. The standard written assessment is still widely used in school and beyond, so however the students have encoded their information, they need to be able to retrieve it and put it on a page in the form requested by the teacher, whether that teacher is me or someone else in the future. As I mentioned earlier, at some time in her stay in my classroom, any student of mine will find that she needs to refer to her notes to be able to perform on an assessment.
Another alternative cognitive mapping activity, and one that I plan to use at the beginning of the year is to have the students produce evidence of something that is already in their head. Because my students are all pregnant or parenting girls, I will probably ask them to explain what their baby looks like. It is a frequent topic of thought and conversation for them, so they clearly have some ideas about it. The trick will be to get them to express their ideas on paper.
Three dimensional plotting
Plotting points on a three axis coordinate system is really just a stepping stone to doing mechanical and isometric drawings, but it is important especially for students who are having trouble visualizing objects in three dimensions. The three planes formed between the three axes, the x-y plane, the y-z plane, and the x-z plane can easily be reinterpreted later as the three common anatomical section planes, when the axes are rotated correctly, so this step is also a good building block for building knowledge of the anatomical planes as well.
Although this is primarily a way to introduce more advanced concepts, it does have some merits on its own. Using a grid to make observations is a useful technique when studying a large object as it allows the viewer to focus on the details of the object without losing the overall picture of the object. This technique also allows students to develop a system to study the general shape of objects they see, which is useful when students are learning to recognize various organs and other similar anatomical features. Incidentally, this technique is sometimes used in biology for counting organisms or counting organisms in a particular sample of a larger population.
For classes other than anatomy, this section may be useful because three dimensional plotting is the basis for most computer aided design (CAD) programs. Although most (CAD) programs are more sophisticated than the one suggested in the activity below, they operate on the same principle. Many CAD programs can also process the design information and convert it into instructions for a machine, which will create a physical model of the object designed in the program. Because of this application of three dimensional plotting, this section and activity may be useful for classes in physics or pre-engineering, sculpture, design or architecture, where participants may go on to use CAD programs such as the ones described above.
Classroom Activity: Aquarium I or plot the points
The classroom activity for this section is concrete and simple; however, it has a few interesting variations. The students will be given an object or still-life of several objects placed inside a glass aquarium tank. If you do not have an aquarium tank, an outline of a box made of dowels, rulers, or similar objects which approximate a glass cube will work, too. The x, y and z axes will be marked on three edges of the tank. If you think your students need a bit more help, you could draw grid lines onto the glass with a dry erase marker or a china marker or tape a gridded transparency over the glass. The objects inside the glass tank should be fairly simple. I plan to use children’s wooden blocks arranged in a still-life. However, any simple three dimensional shapes will do for this exercise. See figure 1 for an illustration.
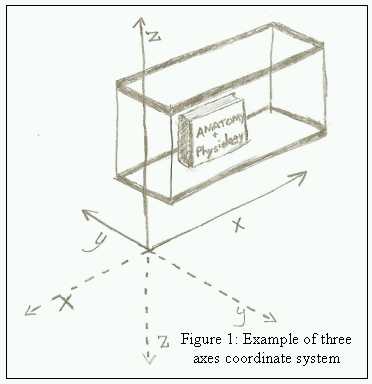
Once the tanks and still-life are set up, have the students write down the coordinates of the edges or corners of the object or objects in the aquarium. The corners of the book in figure 1 would be a good beginning exercise. I suggest that students be allowed to work in small groups on this project so that they can help each other with it. If your class is advanced enough, you could have them graph the object on a set of three dimensional axes directly from what they see in the tank. If your class is somewhat less advanced, I would recommend that the students input the coordinate data into a graphing program like winplot, maple, or some similar program.
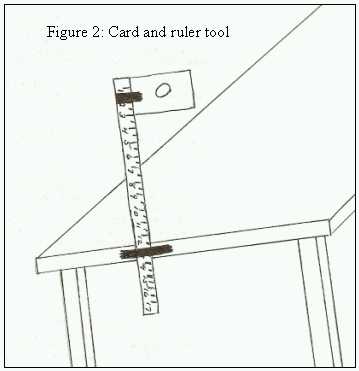
Parallax, or the apparent movement of an object when a viewer’s position has changed, may be a bit of a problem in this exercise and the ones which follow. There are a few things that can be done to help reduce the incidences of this problem. First, be sure that the objects in the aquarium are near the axes. Be sure that the students are all fairly close to the axes as well. If your classroom has chairs, be sure that the students are sitting in the chair with both feet on the floor and that the chair, table, and aquarium are level, or at least parallel with each other. If your classroom has stools, be sure that the students are sitting squarely on the stool, directly facing the aquarium, rather than twisted around as many students seem to prefer. Be sure that the aquarium is taped in place, so that it is not moved during the drawing process. Finally, if your students tend to have trouble sitting still in one place for more than a few minutes, I recommend using the index card and ruler technique. This technique is adapted from an illustration in Ernest Norling’s book. Take an index card and make a hole in it about the size of a nickel, or big enough to fit one eye. Tape the card to one end of a ruler. Tape the ruler perpendicular to the surface of the table so that a student can look though the hole in the card at the aquarium while comfortably seated. See figure 2 for details. For this part of the unit, the card and ruler may be moved so that the student is looking directly at particular points of the object; however, for the perspective section of this unit, the card and ruler should not be moved.
When the students have completed their list of points and their graphs, have the students dismantle their still-life or remove their object and exchange graphs with another student or group of students. The students will be asked to reconstruct the original still-life using the graph provided by their classmates. This is where connections made when they created a graph should help the students to make the connection that what is on the paper once had a three dimensional reality and can have a three dimensional reality again.
Class Activity: Variations on Aquarium I
One variant on this activity would be to use a slightly more complex object, like a model of an organ, and have the students establish a topography, or a topographic map, of the organ, again using the axes established using the aquarium or other devices. This is slightly more complex, but it might be a good exercise for classes that are using topographical maps, such as a hydrology unit a science class or a social studies class.
Another variant on this activity is to use the “mystery box” approach to this problem. In this approach, an opaque box is given to the students containing an item that they can not see, but which they can feel. The students are asked to draw the object, again using the three axes, which are labeled on the box. The drawings could be done using a topographical approach as well. This approach has the advantage of allowing kinesthetic learners to use their abilities. However, it may be difficult for other learners who are not kinesthetic.
Multiple views
Different professions call the collection of views of an object by different names. In engineering, they may be referred to as engineering drawing or mechanical drawings. In architecture, and in some engineering applications, they may be called elevations and plan views. Sometimes they are referred to as side views or bird’s eye views as well.
5
In anatomy, there are three commonly used views or sections: coronal, transverse, and sagittal.
We will explore mechanical drawings and anatomical sections, which are surprisingly similar, although they tend to be displayed in a different manner. In mechanical drawing, there are three views, called normal views, which are most commonly used. These views show an object from the front, the top, and from the right side.
6
This must be a fairly universal solution to the problem of showing three dimensions on paper because, as it happens, anatomists solve the problem in a similar. Anatomists, however, call the views coronal (or frontal), from the front; transverse (or axial), from the bottom; and sagittal, from the side.
7
In addition to basic views from the top, front and side, various professions sometimes use views from inside an object. This is particularly useful in anatomy, but it is also sometimes used in architectural drawings. These inside views of an object are called sections. Essentially sections are what you see when you slice an object open. Most of the time sections are created as planes that are parallel to the views mentioned above as it makes it easier to orient the viewer as to what her or she is observing. This idea will be further refined in the section on the fruit slicing class activity.
Classroom Activity: Aquarium II or mechanical drawings
The authors in
Mechanical Drawing
use the analogy of a glass box to explain how to draw the three normal views found in a mechanical drawing. I find my students benefit from a concrete example, even when they are juniors and seniors, so we will use an actual glass box, an aquarium, to practice mechanical drawings, which as was mentioned above are strikingly similar to anatomical views.
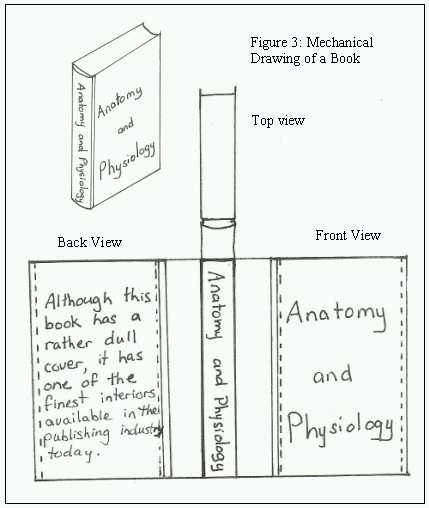
In this activity students will again use the aquarium and still-life that was used for the previous three axes plotting. However, instead of plotting the points of the objects in the aquarium, students are going to trace what they can see of the objects from a particular view point. Depending on your class, you may want to consider using the index card and ruler tool for this activity. So, if a student is sitting at the end of the aquarium, she will draw only what can be seen of the still-life from the end of the aquarium. She will end up with a front view of the still-life. Likewise, if a student is sitting at the side of the aquarium, she will draw only what she can see from the side. She will draw a side view of the still-life. Finally, it is essential to also get a view from the top of the aquarium. This one might be a bit tricky if the aquarium doesn’t have a lid. In the case of an aquarium without a lid or with only a screen for a lid, I recommend using a piece of plastic, like a see-through clipboard or a piece of plexi-glass. The setup will look like figure 1, but the drawings produced will look more like figure three. Essentially, the students are tracing what they can see through the glass, which is probably a good way to explain it to them. The drawings, if assembled, would look like the mechanical drawing in figure 3, however, instead of being drawn on one piece of paper and connected by lines, they will be on separate pieces of paper and taped in place on the aquarium.
When the drawings or tracings have been completed, the students will, again, disassemble the still-life, but they will leave their drawings in place on the aquarium. The students will change to a different aquarium and will reassemble the still-life in that aquarium according to the drawings.
Again, this activity is designed to assist the student in building a model of the types of drawings and the physical realities that the drawings represent. The next activity is designed to further elaborate on the concept by exploring the sectioning techniques commonly used in anatomy.
Class Activity: anatomical sectioning or making a salad
Whenever possible, I like to find ways to make an ordinary activity more interesting in class. Whenever possible, my students like to eat things in class. This activity will satisfy both desires. I realize that this is strictly taboo in most science classes because of the toxic nature of many of the experiments preformed in class. However, as I mentioned earlier, my students are all pregnant or newly parenting girls. One of their special needs is the requirement for small meals every few hours. Another of their other special needs is their absolute requirement for an environment free of toxic materials. As a result, my science classroom is no more toxic than any of the other classes in school. However, that being said, I would still recommend doing this particular activity in some place approved for food consumption, like the cafeteria.
Many students learn best by doing things. This is particularly true for kinesthetic learners, but it can be true for others as well. This activity is designed to help students understand the principle of anatomical sections by having the students create sections. In this case, the students will be sectioning (cutting) fruits and/or vegetables. If your school has a policy about not having knives in school, you may want to do this activity with something like jello or even play dough and use rulers to create the slices instead.
Essentially, the students will be making a salad, either a fruit salad or a vegetable salad. My students tend to be fond of fruit salad, so we will probably use fruit for this exercise. In this exercise, each student will be given a piece of fruit. A few students will be asked to section their fruit into coronal sections. The students will be asked to set aside one section of the fruit which they think best exemplifies what a coronal section of the fruit looks like. The student will, then, be asked to create sagittal sections and transverse sections, removing the core if necessary. In other words, the student will finish dicing her piece of fruit. Other students will be asked to start with transverse sections or sagittal sections and also set aside one section of their fruit which exemplifies their particular type of section. There are some very good examples of anatomical sectioning found in the website section of the resources.
Once exemplars of each type of section have been created, the students will be asked to record the appearance of each type of section for each fruit. A sample worksheet may be found in the resources section at the end of this unit which will make it easier for the students to record the type of section and correlate it to the mechanical drawing views they will have done earlier. The final salad will be eaten at lunch, although the exemplar sections will probably need to be discarded because of the number of people handling them.
I plan on teaching this unit in the fall when my students first enter my class. If one were ambitious and had the time, it might be possible find some interesting jello molds for things like skeletons, brains, or other interesting anatomical parts. It might be an interesting twist to make layered jello molds using different colors of jello to use for sectioning. To make multilayered jello, make a batch of jello and partially fill the mold. Allow the jello to set a bit, but not fully, and add in a second color of jello. Continue in this fashion until the mold is full or you run out of patience. Allow the whole collection of jello to fully set before sectioning it. If one were going to the trouble of creating a multi-color jello, one might also add soft fruit, like that found in canned fruit cocktail to make the sections more interesting to observe.
This activity could also be used in biology classes to teach about the inside layers of the body, particularly if the jello or play dough approaches are used.
Isometric Drawings
Isometric drawing is a nice step between anatomical sections and the perspective views that frequently occur in the texts. Isometric drawing is a systematized drawing method that is common in engineering and manufacturing. It allows the viewer to see all three dimensions of an object, at least in part, in one drawing. Because these drawings are done using a particular system, they are easy to do and can be made using existing mechanical drawings or anatomical section views. However, they are easier to do when applied to objects with mostly straight sides. As a result, human anatomical parts and other natural objects may be somewhat challenging to draw using this method. However, the drawings do have some value in that they are another way to show how three dimensions can be portrayed on paper.
In isometric drawing, all lines that are parallel in real life are parallel in the drawing. This is not true in perspective drawing, which will be discussed in the next section. Isometric drawings also generally feature measurements because they are frequently drawn to scale.
Classroom Activity: Aquarium III or a 3D drawing
This section does not specifically require that students have done drawings in the aquarium II activity, but they will make this activity far simpler. I recommend starting with a demonstration using a simple box-like structure before having the students start on their activity. In this activity, students will again draw an object or a simple still life inside the aquarium. Once the drawing is complete, the students will remove the object(s) from the aquarium and trade drawings to have another student reconstruct the original still life from the drawing. As this is being done in an anatomy class, I may try to include some pieces that are rounded, like cylinders or pieces of rope so the students start to get the idea of what more anatomical shapes look like when drawn. New pieces are likely to bring some new excitement to the unit as well. The basic instructions for constructing an isometric drawing are found below, illustrated by figure 4; however, more detail instructions can be found in both Jamison and French.
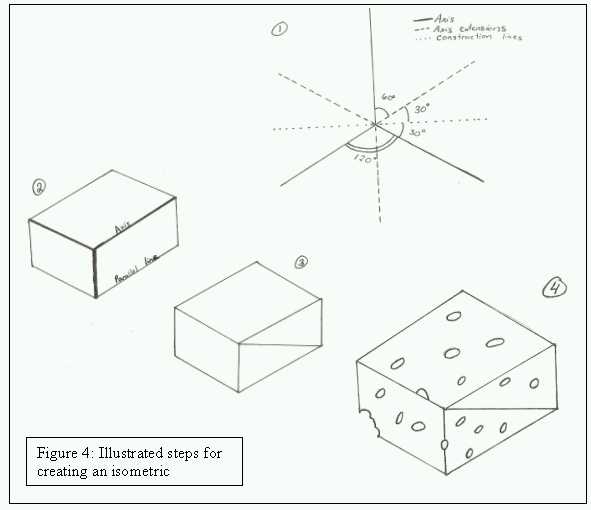
First, axes should be constructed for the drawing. As this is a three-dimensional drawing, three axes are necessary. They should be drawn 120 degrees apart with one axis either vertical or horizontal, vertical is more common. The axes will look like the ones illustrated in figure 4, step 1, although mine are not drawn to scale. Next, any lines that are parallel to the axes should be drawn and drawn to scale. This is where the drawing from Aquarium II will start to be useful. Each of the three drawings will show which lines are parallel on a given side. By now, most figures will be starting to show their true form and some of the details can be added. Lines that are reasonably straight, although they are not parallel to the axes should be drawn in. Finally, any curves or other details should be added. When all of the lines are drawn, any labels, such as measurements, should be added.
Perspective
“The artist’s business is to be able to draw an object so that it will look solid and not flat like the surface of the paper on which it is drawn.”
8
The student’s job is to interpret the drawing on the flat piece of paper such that it appears in the mind’s eye as a whole three dimensional object.
Anatomical illustrations in text books may not be in perfect perspective, but they are frequently drawn in a fashion that resembles it. This section, again, attempts to teach the student to read a drawing by having them create a drawing. Because this is an anatomy class rather than an art class, the object the students will draw will be simple enough that they do not take more than about a class period to complete, but complex enough that they will be able to apply the ideas to the significantly more complex shapes found in anatomy.
Occasional references to horses, carts, and streetcars tend to date the book a bit, but Ernest Norling’s book on perspective is an excellent basic reference. It is one of the few books I have found that is written at a level that most of my students would be able to read. The instructions are clear and the illustrations are very helpful. Most of the information in this section is derived from his book.
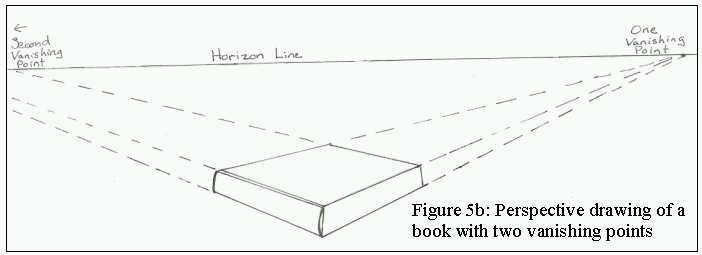
The basic idea of perspective drawing is that all lines which are parallel to the ground, in the object being portrayed, recede to the horizon at one or more points called vanishing points. This is where it is useful to have covered the isometric drawings because the students will be accustomed to identifying parallel lines. The horizon is determined by the placement of the viewer relative to their surroundings. The height of the horizon is determined by the height of the viewer’s eye, or eye level. The vanishing point is determined by the viewer’s eye relative to the object(s) in the scene being drawn. Generally, if the viewer is looking at an object straight on, there will only be one vanishing point directly above or below the center of the object on the horizon. Figure 5a illustrates this type of perspective. The perspective effect is slightly exaggerated, and the lines have been extended to the vanishing point for illustrative purposes and would not normally appear in a perspective drawing. If, however, the viewer is looking at the object(s) from an angle, then there is more than one vanishing point, usually two unless the object is very complex. Figure 5b illustrates a perspective drawing with two vanishing points. The perspective effect is also slightly exaggerated in this illustration, and, again, the lines have been extended to the vanishing points for illustrative purposes and would not normally appear in a perspective drawing. In both illustrations, moving the vanishing points further away from the book would make the book appear less distorted.
9

Constructing a perspective drawing is fairly simple, especially if one has already gone through the construction of an isometric drawing. Lines that are parallel to the horizon in the scene are parallel to the horizon in the drawing. Lines that are in the vertical plane, perpendicular to the horizon, in the scene are perpendicular to the horizon in the drawing, too. All other lines should recede towards a vanishing point. Beyond these rules, one just follows the same procedure used to construct an isometric drawing except that in this case, there is only one axis, the horizon. In the isometric drawing, one starts with the three axis, x, y and z, to determine the placement of later lines; in the perspective drawing, one starts with the horizon and one or more vanishing points. In an isometric drawing one fills in lines that are parallel to the axis first. In a perspective drawing one draws the lines that are parallel to the horizon first. Be sure to mark the corners of the objects in the scene on the horizontal lines just drawn. Once the horizontal lines are completed, draw any lines that are in the vertical plane in the object or scene; these will be drawing in perpendicularly to the horizon and will get smaller as they approach the horizon. Then, draw any other reasonably straight lines that are in a horizontal plane and are perpendicular to the horizon. The spine of the book in figure 5a is an examples of this sort of line. Note: these lines will connect points on the object to a vanishing point on the horizon, so they will not actually be perpendicular to the horizon in the drawing. Fill in any other lines, including diagonal, circles, and irregular curves. The curvature of the spine of the book in figure 5a is an example of this sort of line. Note that a circle seen from an angle always looks like an ellipse, so if you have drawn any circles in your drawing on any surface that is not directly facing you, you may want to reconsider your drawing. Finally, put in any finishing touches like shading, lettering, or coloring you might like to add. I probably will not go into drawing shading and shadows with my students because the topic is more complex than is really needed to understand the diagrams we will study, and shading does not normally appear in modern anatomical drawings. However, if it seems appropriate for your class, there is quite a bit of information on the subject in both Norling’s book and Merrifield’s book
Classroom Activity: Aquarium IV or relating perspective drawings to cognitive maps
For the purpose of this exercise, perspective drawings will have one vanishing point or two but not more. This should simplify the exercise a bit. In this exercise, the students will do a perspective drawing of an object or objects that they have drawn in other ways before. However, instead of exchanging drawings with classmates and reconstructing a still-life, the students will exchange drawings with their class mates and explain, in their favorite form of notes, what the image shows. This skill goes back to the cognitive mapping at the beginning of the unit and is the skill essential to being able to understand what is shown in a diagram. A student must be able to see an image, translate it into something they understand, encode the information for later, and be able to recall the information at a later date.