Prior to teaching this unit, it will help if your students understand the hydrologic cycle and local watersheds.
Lesson 1: I find it is helpful to introduce a topic through a piece of literature.
Germs Make Me Sick
by Melvin Berger, the Kid’s Discover Series issue on
Microbes
, or
Tiny Creatures: The World of Microbes
by Nicola Davies are three recommended suggestions. After sharing the book, lead a discussion about what students know about “germs.” Use a KWL (three columns, what I Know, what I Wonder, what I Learned) chart to record student thoughts. This provides an excellent way to reveal prior knowledge and misconceptions. Simple questions such as “Why do we wash our hands before we eat?” or “What will happen if you drink dirty water?” can be asked to promote discussion.
Lesson 2: (can possibly be combined with lesson 1) In my STEM lab, I have access to several light microscopes, a digital microscope that can be attached to a document camera, and prepared slides that include several types of bacteria, worm eggs, protozoa, etc. If you have access to these materials as well, this would be an excellent opportunity for students to get an up-close look at several microorganisms. Prepared slides can be purchased from many different school science supply stores, and are also carried on Amazon.com. You can also create your own with blank slides and a drop of pond water, although prepared slides often produce better results. Students can record sketches of what they see under the microscope and label them on chart paper or in a lab notebook.
Lesson 3: Testing for bacteria coliforms, specifically
E. coli
. 3M produces a product called a Petrifilm. It is essentially a prepared petri dish on a paper card with a plastic cover. You may be able to obtain these for free directly from 3M since they are for use in a classroom. You want the version that tests for
E. coli
. It has a pink agar surface. To test for bacteria, give each student a Petrifilm and a sterile cotton swab. All they need to do is swipe the swab on a surface they want to test, and then swipe the swab on the pink agar. Cover it up with the included plastic sheet, and bacteria coliforms should appear within 24 to 48 hours. Students can count each coliform to get an idea of how much of these bacteria are present on the object they tested.
E. coli
will appear as a blue splotch per the 3M web site. Students will use this testing method later to determine if their engineered water filter is working to filter bacteria, but for now they should enjoy learning about the testing procedure and this gives them an opportunity to practice.
Lesson 4: Model water purification with calcium hypochlorite. This demonstration will show how particles in dirty water can congeal for easier filtration. You will need a packet of calcium hypochlorite, two buckets or clear containers, dirty pond water, two 3M Petrifilms, and two t-shirts or similar material. The calcium hypochlorite can easily be obtained through Amazon.com or other science retailers and is inexpensive. Have students observe the water, and then filter the water through a piece of cloth to remove any large particles. The water will still appear cloudy. Test the water on a Petrifilm and label it “untreated.” Add the contents of the calcium hypochlorite and gently stir. Allow the particles to congeal and settle over several hours. You will notice rust colored blooms that look like snowflakes in the water. This is the calcium hydrochloride at work, causing particles to congeal. After several hours, filter the water through a cloth. You might need to do this twice, although now the water should look clear. Run another test on the Petrifilm and label it “treated.” After 24-48 hours, you should see bacteria coliforms on the untreated test PetriFilm, while the treated Petrifilm should be free of bacterial coliforms.
Lesson 5: Model sand filtration. In this lesson, you will demonstrate how to construct and test a handmade water filter using gravel, sand, and activated charcoal. The combination of these materials, in layers, will trap particles as the water percolates through them. This is a great method for making the water clear, but it does not necessarily purify the water by killing all microbial pathogens. Do not drink the water! In an emergency, however, this type of filter will reduce your chances of getting sick. A quick google or Pinterest search will reveal several ways to make a water filter in your classroom. You will need a two-liter bottle, gravel, clean sand (often sold as playground sand), activated charcoal (available at most hardware stores), cloth, and a container to catch the clean water. Start by cutting the bottom off the two-liter bottle, leaving the bulk of the body and neck of the bottle as one piece. Secure a piece of cloth (or coffee filter) to the small opening of the bottle with a rubber band. Then add an approximately two-inch-thick layer of activated charcoal, followed by several inches of sand, then several inches of gravel. Pour dirty water over the gravel. As the water percolates through the layers of gravel, sand, and charcoal, you will need a container to catch the clean water as it passes through. Use 3m PetriFilm strips to test the water for microbes before and after it passes through the filter. If you happened to be stranded on an island, you could make charcoal by burning wood and dousing it with water before it burns completely. Grind it into small pieces, then rinse it well. In this situation, it is much easier to buy activated charcoal at a hardware store.
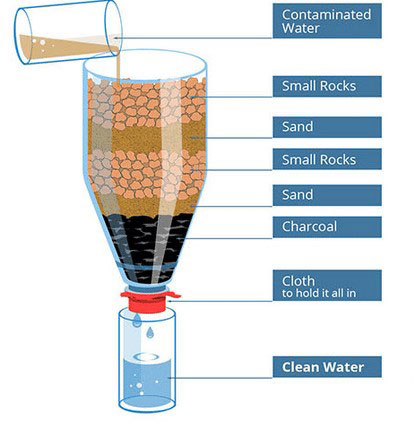
Figure 5. A basic water filter. Image from http://100-best-water-filters.com/build-water-filter/ (public domain).
Lesson 6: Engineering a Water Filter Project. In this final project, students will create a water filter much like the one modeled in lesson 5. Group students how you see fit. Given the situation that they are stranded on an island and need fresh water to drink, students will need to construct a water filter out of found materials. Provide students with sand, gravel, maybe some activated charcoal, and a variety of containers and materials that could be used as a filter. Having a large variety of materials to choose from should lead to more unique designs. Students will select from the materials and construct a water filter of their own design, then test the filtered water with 3M PetriFilm. In my STEM lab, the final project counts as either a pass/fail, but you could certainly develop a more structured grading rubric if you choose.