This unit relies on demonstrations, student-led experimentation, and careful recording of results. While the goal for students is to make the perfect playdough, the science goals for this unit are heavily steeped in the NGSS Practices. The applicable practices include 1) Asking Questions and Defining Problems, 2) Developing and Using Models, 3) Planning and Carrying Out Investigations, 4) Analyzing and Interpreting Data, 5) Using Mathematics and Computational Thinking, 6) Constructing Explanations and Developing Solutions, 7) Engaging in Argument from Evidence, and 8) Obtaining, Evaluating, and Communicating Information. There are no chemistry standards for 2nd grade.
The unit is divided into five one-hour long sessions. The first three sessions will include teacher/student discourse about the topic along with a demonstration. At the end of each demonstration, students will repeat the demonstration by making the same thing. The final two sessions will allow for greater, student-led experimentation. In the end, students will evaluate their final products, discuss their results with other classmates, and come up with a class consensus for the best process for making playdough. Students will be encouraged to record each process and evaluate the playdough according to a class established rubric.
My Experimentation Results
I conducted several experiments to research this unit. These experiments can be repeated in a class setting.
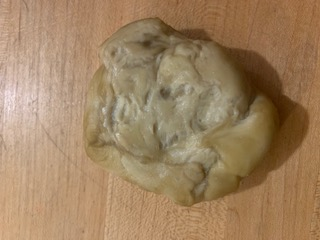
Figure 3 This is the 40g gluten mass I extracted from 200g of all-purpose flour and 50g of water.
Gluten extraction demonstration: For this experiment, I wanted to see if I could extract the gluten from flour by rinsing away all the starch. I started with 200 g of flour and 50 g of water – enough to make a ball of dough. After kneading the dough, I rinsed it under cold water for about ten minutes, making sure to massage out as much starch (cloudy white in water) as I could. The result was a 40 g mass of gluten. It resembled semi-dried glue. It was stretchy and elastic yet would tear if pulled too far apart. Torn pieces were reabsorbed into the mass of gluten with a little bit of kneading. The first experiment was with all-purpose flour, and it produced the 40 g gluten mass. The second trial was with gluten-free coconut flour, and it did not produce any gluten. All the flour just rinsed away. This would be a good demonstration to record on video and share with the class.
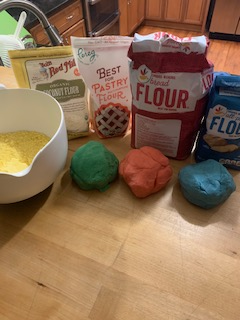
Figure 4 Playdough produced by gluten-free coconut flour, pastry flour, bread flour, and all-purpose flour.
Types of flour: In this experiment, I created a basic playdough using 200 g flour, 100 g salt, 200 g water. The three ingredients were mixed under medium heat in a saucepan. When the soupy dough congealed, and formed a solid mass of playdough, I let it cool for 5 minutes and then kneaded the dough for 5 minutes. The only difference was the type of flour I used. Batch 1 used all-purpose flour, batch 2 used bread flour (highest gluten potential), batch 3 used pastry flour (lowest gluten potential), and batch 4 used gluten-free coconut flour. The first three batches turned out remarkably similar, with no noticeable differences. The 4th batch, gluten-free, did not produce a playdough. I could see the coconut flour absorbed the water, but it was fluffy yet still dry to the touch. My recommendation based on these results is to just use the cheapest all-purpose flour. The differences in gluten levels did not seem to matter too much unless it was gluten-free. Unfortunately, without the added ingredients of cream of tartar or oil, these batches of playdough became very sticky after two days of sitting out.
Added oil: Following the same recipe for playdough as above, I also added 10 g (about 2 tablespoons) of vegetable oil (although any oil, especially scented lavender oil, will work). The result was a softer, smoother texture. After two days of sitting out, this batch was still pliable and not sticky like the other batches.
Added cream of tartar: I also created a batch with an added 10 g of cream of tartar. The result was a smoother playdough that was much more elastic and only slightly sticky to the touch. After two days of sitting out, this batch was still pliable and not sticky like the batches without oil.
Added oil and cream of tartar: Finally, I created a batch following the same steps, but this time added 10 g of oil and 10 g of cream of tartar. While the result was like the batch with just cream of tartar, it was slightly less sticky to the touch and a bit less elastic. After two days of sitting out, this batch was still pliable and not sticky like the other batches. This was my preferred version.

Figure 5 All samples prepared for two days of storage, both inside and outside of a plastic bag.