Waltrina D. Kirkland-Mullins
Korean cooking is often an experimental process. Pinches of seasoning and dashes of oil serve as measurement standards. Strong hands and seasoned years of creative culinary artistry result in distinctively delicious culinary creations. At this point in our unit, we will have an opportunity to try our hands at creating three traditional Korean dishes.
Unlike seasoned homemakers, we will focus in on the chemistry and physics that occur when creating three Korean mealtime favorites. We will observe and record our findings in a Science Lab Journal (a Composition notebook will do just fine) using corresponding Observation Worksheets (see Attachments A, B, and C) for each cooking experiment. On the menu are kimchi, green tea, and sticky rice.
1. Kimchi… What's scientific about it?
Kimchi is a traditional vegetable dish widely eaten throughout Korea. For many outside of the culture, it is a food to which one must become accustomed. Combined with hot peppers, garlic, radishes, dried fish such as shrimp or anchovies (optional), and intact cabbage leaves and stems, kimchi is a spicy, nutritional food source. What's scientific about it is the process with which it is created, for the cabbage is fermented.
Nutrition, we know, is the ultimate goal of producing food. Korean farmers and their wives used scientific ingenuity in this regard, for as was previously stated, seasonal conditions and more impacted the production of crops. Korean housewives created kimchi to provide a vitamin-rich food source during brutally cold winter seasons--a time when no fresh vegetables were available. Kimchi proved to be an abundant, healthy option.
What is fermentation? Fermentation is a method of preserving food that has existed for centuries. Because of the process, a chemical change in sugars brought out about by the enzymes of living organisms takes place. Sauerkraut, cucumbers, olives, and Hawaiian poi (fermented taro root) are other types of food products resulting from various types of fermenting processes. No cooking is required to activate the process.
As was previously noted, cabbage is a main ingredient used in the making of kimchi. Traditionally, its ingredients were placed in sealed clay pots. These containers were subsequently filled with salt or sea water. Air was totally removed from the pots by submerging the cabbage in a saline liquid to begin the fermentation process. The cabbage was completely covered with the salt water solution to limit its exposure to oxygen, then subsequently sealed to keep the oxygen out. This acidic, alcoholic mixture surrounded the ingredients and, in time, impacted the flavor, smell, and texture of the original vegetable(s). Benign microbes began to form within the acidic, alcoholic liquid. This process also suppressed the growth of other microbes that cause spoilage and disease. The benign microbes helped to transform the covered vegetables into a spicy, tangy, nutrient-rich food source that could be used and/or stored for prolonged durations. The kimchi fermentation process is a tradition that has been handed down over the ages.
Why is salt necessary in the fermentation process? Salt or brine is used to draw water, sugars, and other nutrients out of the cabbage plant. This liquid surrounds the cabbage, preventing harmful microbes and germs from getting in.
Why were earthenware vessels used to store kimchi? Earthenware pottery was widely created and used in ancient Korea. The pottery was handcrafted and baked for durability. Their inner walls were difficult to clean completely and allowed for benign microorganisms to stay within the container. This remaining lining helped to initiate the successful fermentation of food stuffs like kimchi.
Kimchi Preparation Long Ago

Traditionally, kimchi pots were partially buried beneath the earth with lids exposed above the ground. The pots remained buried from approximately late autumn (beginning in October through November) through the end of the winter season (which depending on the locale and monsoon season temperatures, fluctuates between December through February). The country's climate during this period ranges from 41 to 57 degrees Fahrenheit. During this seasonal period, fermentation takes place within the pots: fermentation results in the cabbage mixture having an intense, spicy, crunch flavor that puts the accent on rice dishes or meat and/or soup accompaniments. By the end of the seasonal process, the kimchi would be ready for serving and/or packaging for later use.
Experiment 1: Kimchi With A Modern-Day Twist
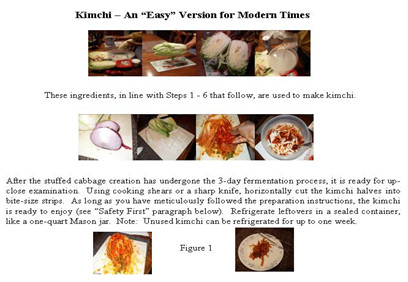
Today, as holds true in many cultures, there is not enough time in a day to prepare foods using traditional methods. Our students will attempt to implement a modern-day version of making kimchi (see Figure 1). Although not an authentic, traditional version of creating kimchi, conducting this cooking activity will give a feel for the time and effort that goes into preparing this nutritional food via the fermentation process. (Kimchi comes in many varieties; recipes for creating them are readily accessible in modern-day Korean cookbooks.) Students will closely examine the cabbage before and after fermentation has taken place. To get started, you will need:
-
* 1 Chinese (Napa) cabbage - approximately 3 ½ pounds
-
* 1 cup of sea salt
-
* 10 cups of water
-
* 1 peeled and sliced fresh ginger root
-
* 1 peeled and slivered medium yellow or red onion
-
* ¾ cup of gochujang (Korean pepper paste)
-
* 1 medium daikon radish, peeled and slivered into very thin strips
-
* 2 large mixing bowls
-
* 1 large airtight container to accommodate the ingredients (e.g., quart-size Mason
-
jar)
Safety First: This activity requires that students observe, smell, and taste kimchi. For health safety reasons, do not allow students to taste the classroom-created version. Opt to have students sample kimchi purchased from a Korean restaurant or market. Be sure to obtain get written permission from parents for their child to taste authentic kimchi. Also, have loads of water on hand, as it may prove quite spicy for some children.
Step 1. Thoroughly wash and dry all vegetable ingredients before using. Remove outer cabbage leaf layers from the head. Distribute one leaf to each team so that each member can closely observe the leaf with their magnifying glass. Have students draw a detailed picture of their leaf on the Kimchi Observation Worksheet (see Attachment A, Point 1). Subsequently remove 2 additional cabbage leaves. Dice them so each student can sample this vegetable in its natural state. Have students correspondingly record their descriptive observations in their Science Journal.
Step 2. Cut the remaining cabbage lengthwise into halves. Combine salt and water in a large container and stir until the salt is dissolved. Soak cabbage halves in salt water solution for 6-8 hours, keeping the leaves completely submerged. (A clean saucer can be placed atop the submerged ingredients to achieve this end.)
Step 3. Remove the cabbage from the salt water solution. Rinse and squeeze out any excess water. Remove three leaves. Halve them and distribute one to each team for observation. Have students record findings (see Attachment A, Point 2).
Step 4. In a separate bowl, combine and toss the shredded daikon radish, slivered onion, and Korean pepper paste until they are thoroughly combined. Set these combined ingredients aside for 10 minutes. (This constitutes the kimchi filling.)
Step 5. Using your fingers, separate the cabbage leaves. Spoon a tablespoon of the filling between each leaf. Rub the leaves with the filling mixture, ensuring all leaves are well coated on both sides. Place the stuffed cabbage in an airtight container. Cover and set in a cool place for 2 to 3 days, during which time the kimchi will undergo additional fermentation. After the kimchi has set and matured, the fermentation process is complete.
Step 6. Remove kimchi. Using clean cooking shears, cut kimchi into bite-size portions. Distribute samples for observation purposes. Retain leftover kimchi in a Mason jar and refrigerate.
An Awesome Discovery!
Have your students closely examine their kimchi creation and record their findings (see Attachment A, Point 3). Students will observe that the sauce-covered cabbage has a beigest white color with a spicy, firm, and crunchy texture. (Because we followed the directions to the letter, I opted to sample our kimchi creation. Mmm! Not bad! For food health safety reasons, I did not allow my students to sample it. That is because if for any reason the kimchi is not placed in an air-tight container, as emphasized in Steps 2 and 5, harmful microbes can make the kimchi go bad, rendering it unsafe for consumption. Additionally, for test purposes, we retained our kimchi version post the recommended refrigeration period: after 10 additional days, we found the cabbage ingredients turned a slimy, dingy green, and the odor was much stronger than before. The kimchi had gone bad! Because of these factors, it is important that students visually experience the classroom-made version).
Trying The Real Thing
Alternatively, allow students to sample authentic kimchi purchased from a Korean market or restaurant. When sampling this version, students will immediately notice a distinct difference between its taste versus that of raw Napa cabbage: authentic kimchi has a crunchy texture and a pickled, spicy taste, indicating that fermentation has taken place--not at all like the fibrous, bitter leaf samples taken from the original head of cabbage. Upon sampling authentic kimchi, have students record their opinion regarding its taste in picture form. (Expect some hilarious artwork!) Subsequently have them com-pare and contrast the taste of fresh Napa cabbage and kimchi, recording their comparative observations in written form in their Science Journal (see Attachment A, Point 4.)
Complementary Activity 1: Arrange for your class to experience a traditional meal with kimchi accompaniments at a Korean restaurant. In New Haven, visit the Seoul Restaurant located on Crown Street. Take photos and have students write about the experience!
Complementary Activity 2: Visit a local Korean grocer/gift shop (in New Haven, visit the Hanmi Korean Market off Edwards and State Streets). Browse through Korean artifacts and assorted foods, including their extraordinary fruits, vegetables, and tasty treats like kimbap (rice rolled in dried seaweed, containing strips of meat, vegetables, and/or egg), melon and/or green tea ice-cream! Interview the storeowner, take photos, and have students write about the experience!
Green Tea - More Than A Beverage!
The Hadong and Boseong, located in the southwestern and southeastern regions of South Korea are two of several one areas known for cultivating green tea. (In Hadong, annual green tea festivals are held during May and June. Both Hadong and Boseong are tourist landmarks.) Painstakingly harvested by predominantly female Korean workers, the tea is enjoyed by Koreans and countless numbers of people throughout the world. Hot cups of unsweetened green tea warm the soul, and Koreans know just how to extract the delicate, mildly pungent flavor from the leaves.
More than a delicious beverage, green tea contains powerful Vitamin C and antioxidants known as polyphenols. These polyphenols give green tea its flavor and color. The National Institute of Health/National Center for Complementary and Alternative Medicine notes that "because of its polyphenol content, green tea is used to inhibit the growth of cancer cells without harming healthy tissue, to lower cholesterol levels, and to fight against the abnormal formation of blood clots. Green tea additionally has been found to have a calming effect on the human nervous system." (NCCAM; 2008)
Producing the perfect cup of green tea is a tricky process. The perfect cup has a mild taste, subtle flavor. If not done properly, those helpful polyphenols that provide health benefits can ruin the flavor, making the tea taste too strong and somewhat bitter. Thus, it is important not to overbrew it.
Experiment 2: The Perfect Cup of Green Tea
Which water temperature is best suited for the creation of green tea? How much time is needed to create this delicious beverage? Students will test to find the answers to these questions in the two trial experiments below.
Trial 1 - Best Water Temperature
You will need:
-
* 1 teaspoon of loose green tea within tea strainer or one green tea teabag per teacup
-
* 3 transparent teacups
-
* refrigerated water/tap water/boiled water
-
* 24 - 25 plastic teaspoons
-
* timer
Step 1. Set up teacups with tea-filled strainer or tea within each.
Step 2. Fill each cup equally with iced, cold, and boiling water respectively.
Step 3. Set timer for 10 minutes; let each beverage-filled cup set for that duration.
Step 4. After 10 minutes have passed, remove teabags or tea-filled strainer. Subsequently provide each child with a plastic spoon to taste tea. After sampling the beverage from each cup, have children tally and graph their results and record their observations (see Attachment B).
Trial 2 - Steeping Duration
You will need
-
* a tea kettle
-
* 1 teaspoon of loose green tea within tea strainer or one green tea teabag per teacup
-
* 4 tea cups
-
* 24 - 25 teaspoons
-
* 4 timers, set at 1, 5, 10, 15 minutes respectively
While conducting this cooking activity, inform students that conduction and convection occur when boiling water in the tea kettle: first, the tea kettle becomes heated. Heat conducts along the tea kettle. The cool water within the within the kettle is heated. The cool water rises as water vapor to the top of the kettle. The cool water in the bottom of the tea kettle is replaced by warmer water. This is called convection. The cycle continues until the entire water-filled kettle reaches the same uniform temperature--212F--the perfect temperature to steep green tea. It is at the boiling point that the water should be immediately poured into the tea-filled cup.
Step 1. Fill tea kettle with tap or spring water.
Step 2. Bring water to a boil.
Step 3. Place teabag or tea-filled strainer in the first tea cup. Fill cup with boiling hot water. Allow tea to steep for up to 1 minute. Taste and record flavor rating.
Step 4. Repeat Step 3, this time allowing tea to steep for 5 minutes. Remove the teabag or strainer. Taste and record flavor rating.
Step 6. Repeat Step 3, this time allowing tea to steep for 10 minutes. Remove the bag or strainer. Taste and record flavor rating.
Step 7. Repeat Step 3, this time allowing tea to steep for up to 15 minutes. Remove the bag or strainer. Taste and record flavor rating.
Children will each be given a plastic spoon to sample tea. After tasting, have children record their results (see Attachments C). After tea tasting has been completed, have students tally their findings and subsequently graph their overall results.
Experiment 3: Rice: Long or Short Grains --Which Is Best?
Rice is a food staple that originated in Asia. It grows well in tropical and semitropical climates. Today, it is consumed by at least half of the world's population.
It is estimated that there are 100,000 different varieties throughout the world. Long grain rice--the most popular rice used in the United States--contains amylose, a starchy carbohydrate. Its elongated grains are 4 to 5 times longer than their width. Because of its amylose content, long grain rice often requires large proportions of water to cups of rice when boiling; its grains tend to easily separate after cooking. Short grain rice is one of many varieties used throughout Korea and other Asian countries. It contains a starchy component called amylopectin that easily breaks down in water. Unlike long-grain rice, short-grain rice is slightly longer in length than in width and requires less water when cooking. Its grains tend to stick together and can be easily eaten with chopsticks. Because of its amylopectin content, short grain rice takes a shorter amount of time to cook.
Rice is often cooked using non-standard measurements of rice to water. Whether using long or short grain rice, how do water and heat impact their grains? The cooking activity that follows reveals the answer.
You will need:
-
* 2 individual cups, each filled with 1 cup of long-grain rice
-
* 2 individual cups, each filled with 1 cup of short-grain rice
-
* 2 cups, each filled with 1 ½ cups of water
-
* 2 cups, each filled with 1 ¾ cups of water
-
* 4 quart-sized bowls
-
* a timer
-
* 24-25 magnifying glasses
-
* a pot strainer
-
* 4 stainless steel pots with tight lids
Before beginning the cooking process, have students use magnifying glasses to examine and compare the long grain and short grain rice samples; also remove 5 rice grains from each pot after performing Steps 4 and 6. Have students descriptively draw and record their observations in their Science Journals.
Step 1. Rinse rice in individual bowls. Discard water when it becomes cloudy.
Step 2. Pour 1 ½ cups of water into 2 individual pots; pour 1 ¾
cups of water into the two remaining pots.
Step 3. Add one cup of long grain rice in each pot filled with 1 ½ and
1 ¾ cups of water. Add one cup of short grain rice in each pot filled
with 1 ½ and 1 ¾ cups of water. Keep all four rice pots
uncovered. Set pots over medium heat until rice comes to a boil.
Step 4. After rice comes to a boil, turn heat down to medium-low. Let it simmer
for about 10-15 minutes. Check pots. Stir and add small amount of water if
grains appear dry.
Step 5. Cover each pot. Let set over medium-low heat for 5 minutes.
Step 6. Lift lid and check grains for small, crater-like pockets. (Add small
amount of water to rice pot if grains appear coarse and dry.) Gently toss grains
with fork. Turn heat down to low, and recover each pot. Simmer for approximately
15 minutes until done.
While conducting this cooking activity, the students will discover answers to the following questions (create a separate Q & A form containing these questions so the children can respond to them in their Science Journal):
What are the generic differences between long and short grain rice? Long grain rice has a thicker coating than short grain rice. When cooking both forms of rice using the equal amounts of water, the shorter grain rice tends to absorbs water faster than long grain rice. It also softens quicker.
Why does rice seem to cook faster when the pot is covered with a lid? Convection, as held true when we boiled water for green tea, occurs within the pot. Additionally and most important, the lid covering the pot helps keep the heat from escaping. The gaseous water (steam) gives off a large amount of heat energy when it condenses onto an object, in this instance the rice. The circulating heat process within the covered pot causes the food to reach the boiling point. Thus, the rice cooks faster.
Why might water need to be added to the long-grain rice during the boiling process?
Because of its starchy outer layer and overall amylose content, the long-grain rice did not immediately absorb the water. The water cooked out of the pot before the long grain rice began to soften. More water had to be added to cook the rice thoroughly.
What step can be added to help the rice better absorb water during the cooking process? Some cooks soak rice for 15 minutes to as much as 3 hours to soften its outer layer. Doing so helps to quicken the cooking process. Still others add more water as deemed necessary during the cooking process. Doing so--particularly for long grain rice allows it to soften in texture.
Can long grain rice be used in Korean cooking? Explain. The response here may vary. Some will discover that although the texture differs slightly, adding water and allowing the long-grain rice to cook for a longer duration softens the rice, making it suitable for a Korean meal. (Students may also find that the long grain rice becomes firm again once it is cooled for a long duration. The short grain rice remains sticky.) In general, short-grain rice proves the quicker, easier rice to use for this purpose.
Conclusion
We have discovered much about Korean culture. Through restaurant visits and in-class kitchen creations, we have sampled authentic and student-created kimchi, rice, and tea. When it comes to a taste of Korea, we know it's more than just cooking! Use this curriculum unit as a framework to explore the history, cultures, and foods of other cultures. Most of all, have fun learning about and embracing our global community!
My name is _____________________________________ Date_______________.