Karen A. Beitler
Lesson Plan 1 Monomers & Polymers
Introduce students to monomers and polymers by explain that one is made up of the other. The links between molecules are called bonds and some molecules are straight, others can be curved, folded or bunched. The simplest molecule to start with is methane(CH
2
). Methane bonds to itself and other molecules and is the monomer basis for hundreds of polymers. Draw the carbon atom on the board for students (6 proton nucleus, 2 electrons in one shell and four in the second shell. Show how carbon has four binding
sites, so it is happily trying to attract other atoms. Explain to students that molecules like to feel complete and that means all their sites are attached to others. Binding sites are where bonds form between molecules. Add four hydrogen atoms to the carbon, explaining how hydrogen has one electron its outermost shell. Explain to the students that this is a monomer and when you link more monomers to it you form polymers. Students should now be ready to explore monomers and polymers on their own through the Virtual field trip.
Objectives
Identify the chemical components of monomers, polymers & macromolecules
Connect monomers and polymer with things used in everyday life
Reason about the similar components of all things; living and non living
Explore polymer science
Lab Activity 1.1
Virtual Field Trip can be downloaded from the website for James Hillhouse High School at http://www.nhps.net/hillhouse/academics.htm#Science
Scroll down to Mrs. Beitler's Science and click on the Polymer webquest with hyperlinks. The outcome of the field trip is a page of notes from which students can join in a group to make a poster about monomers and polymers. Teachers may want to print the sheet for students to fill in. The answer sheet can be found in Appendix B.
Extension: Teachers can visit the website Playing with Polymers at http://www.reachoutmichigan.org/funexperiments/agesubject/lessons/polymer.html to find a quick, fun hands on activity for students to support this lesson.
Lab Activity 1.2
Review of the Macromolecules with student worksheet. Print Pre/Post test, Monomers of Macromolecules work page, and Tree of life worksheet for students
Tree of Life to Macromolecules. All can be found at:
http://www.concord.org/~btinker/workbench_web/unitIV_revised/act1.htm
There is good visualization of progression of monomers to polymers and connections to biological macromolecules.
Extension: Visit http://www.kids.union.edu/makingPolymers.htm for a polymer game and recipe for making polymers in the classroom. Alternatively use Study Stack at http://www.studystack.com/studystack-7111 where you can find a series of printable puzzles and games with answers that can help students memorize facts about macromolecules.
Lesson Plan 2 Identifying Macromolecules in Foods
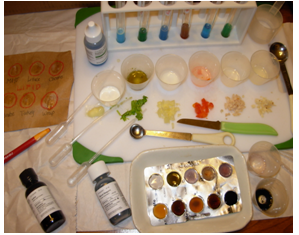
Using chemical reagents students will test six foods for the presence of glucose and starch. Before these activities, introduce the macromolecules. I ordered a reagent kit for around $ 30 from http://www.hometrainingtools.com/chemistry-of-food-experiment-kit/p/KT-CHEMFD/ . The kit contains all you need to do approximately 10 tests for glucose, starch, protein and Vitamin C and a few added items. The basic reagents are Benedict's solution for glucose, iodine for starch, Biuret reagent for protein. I would purchase Sudan IV for lipids in addition. The directions for these tests are simple and easily found on the internet or in any good biology book. Below you will find basic instructions for quick macromolecule labs.
As the lesson begins remind students that monomers are small molecules that are linked to make polymers. Ask questions like; what is a monomer? (Molecules built from smaller, simple molecules.) What is a polymer? (Repeated, linked units.) Show monomers turning into polymers on the board. Tell students that this is a very important concept, if they learn to categorize in this manner that they will understand biology! Print Worksheet 1 and hand out to all the students. Ask volunteers to read the definitions. As each definition is read, give examples and draw structures on the board. Have students copy structures into their handout.
Objectives
Identify carbohydrates, lipids and proteins in foods.
Determine the different types of carbohydrates in food
Understand the hydrophobic nature of lipids.
Discover the variety that exists among proteins.
Describe the effects of heating molecules- denaturing proteins (enzymes)
Lab Activity 2.1 Test for Carbohydrates (Student worksheet in Appendix B)
Ask students 'What is another name for carbohydrates?' Assign each student a definition from the handout and ask them to come up with as many examples as they can for each type of molecule. List them on the board and discuss how each example fits the category. Ask student how they came up with their examples.
Prepare test solutions: Give students 1/4 teaspoon of tomato, lettuce, cheese, turkey and a sandwich wrap with a mortar and pestle. Instruct them to clean the mortar and pestle well and then mash one of the food items until it is a paste. Ask the students to add the item to 1 teaspoon of water in a small cup and stir well. Have them clean the mortar and pestle and mash the next item until all six have been placed in cups. (Alternatively, student groups can do different items and report the results to the class.) These liquids are the test materials for all test reagents.
Test for Glucose
Materials; Benedict's solution, pipettes, 6 small test tubes, test tube rack, test tube clamp, 250 mL beaker, small pan, burner or hot plate
-
1. Label 6 test tubes with the names of each of the foods given.
-
2. Add 5 ml of Benedict's solution to each of the 6 labeled test tubes
-
3. Add 15 drops of each food solution to the corresponding labeled test tube, stir.
-
4. Make a chart to record two results for each food; Beginning color, ending color.
-
5. Record beginning colors for all 6 test tubes after adding the 15 drops
-
6. Place the beaker in the sauce pan, add water to equal levels inside and out
-
of the beaker and set on the burner to boil.
-
7. When big bubbles rise to the top, turn the burner to low & place all six test
-
tubes in the beaker
-
8. After three minutes, turn the burner off, remove the pan from the heat and using
-
the test tube clamp, remove the test tubes from the beaker back to the tube rack.
-
9. Allow the solutions to cool five minutes, swirl to mix and record colors in a chart.
-
10. Compare results with class mats. Green, yellow, orange or red indicates the
-
presence of glucose. Dark red indicates more sugar then the others
Lab Activity 2.2 Test for Proteins and Lipids
Assign students each a definition and ask them to come up with as many examples as they can for each type of molecule. List them on the board and discuss how each example fits the category. Ask student how they came up with their examples.
Other procedure and reagents can be explored for alternative labs at these sites;
Glucose Test strips procedure can be found at: http://www.nutrition.org.uk/upload/Test%20foods%20for%20glucose.pdf
Benedict's solution for starch a procedure can be found at: http://www.miniscience.com/projects/starch1/
Identifying Lipids and Proteins; Ideas for procedures and materials can be found here:
http://www.scienceteacherprogram.org/biology/Lillien02.html
and
http://chem.lapeer.org/Bio1Docs/ProteinLipidLab.html
or
http://seplessons.ucsf.edu/node/362
Where is the Protein?
Materials; Biuret solution; test sample solutions
1. Label 6 test tubes with the names of each of the foods given.
2. Add 15 drops of each test solution to each of the 6 labeled test tubes
3. Add 3 drops of Biuret to the corresponding labeled test tube, stir.
4. Make a chart to record two results for each food; Beginning color, ending color.
5. Record beginning colors for all 6 test tubes after adding the 15 drops
6. Record ending color after stirring.
Looking for Fat; Lipids tests
Materials: Sudan IV, brown paper bag, test sample solutions, oil, water
-
1. Label 6 test tubes with the names of each of the foods given.
-
2. Add 15 drops of each test solution to each of the 6 labeled test tubes
-
3. Add 3 drops of Sudan IVs food solution to the corresponding labeled test
-
tube, stir.
-
4. Make a chart to record two results for each food; Beginning color, ending color.
-
5. Record beginning colors for all 6 test tubes after adding the 15 drops
-
6. Record ending color after stirring.
-
7. Using a wax pencil draw a circle the size of a quarter for each solution on a
-
brown paper bag. Add one circle for water and one for oil.
-
8. Put one drop of each solution into the labeled wax circle, add one drop oil to oil
-
circle and water to water circle and allow to dry
-
9. Record the appearance of the circles by comparing them to oil and water.
Lab Activity 2.3 - Spin Test for Milk (worksheet Appendix B)
Using the reagents and a microcentrifuge, students develop a procedure for finding the macromolecules in milk. This activity has students comparing the level of fat, water and protein in 3 types of milk. Students measure the layers and write a procedure to determine the macromolecule in each layer. Format and print Worksheet 2 for students.
Objectives
Write a procedure for lab experimentation using known reagents
Explore centrifugation and separation of a liquid
Identify layers in a centrifuged specimen
Determine the macromolecules in milk
Extension: Students can read and answer questions at http://bioweb.wku.edu/
courses/biol115/Wyatt/Biochem/macromolecules.htm for a review of this lesson.
Lesson Plan 3 - Building Macromolecules
In this lesson, students form the structure of the macromolecules using foods. The first activity has the teacher modeling each monomer using either colored marshmallows or gumdrops and toothpicks cut in half. In the second activity students use vegetable slices and create models from drawings. Common vegetables represent elements found in the macromolecules and spaghetti is used to represent the bonds between the molecules. Students will recognize the way macromolecules are put together and discover how smaller molecules are repeated to form polymers.
Objectives
Name the four types of macromolecules.
Identify the formula of water, carbohydrates, lipids and proteins
Identify the terms monomer and polymer
Lab Activity 3.1 - Building Polymers from Monomers
Mini marshmallows of four colors or gumdrops (4 colors), toothpicks
Teacher models monomers & polymers, student copies models
Lab Activity 3.2 - Vegetable Macromolecules
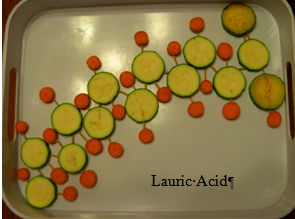
In this activity students form the physical structure of the macromolecules using vegetable slices. Common vegetables represent elements found in the macromolecules; spaghetti is used to represent the bonds between the molecules. Students will recognize the way macromolecules are put together and discover how smaller molecules are repeated to form polymers. Format and print Worksheet 3 for each student.
Materials: Vegetable slices; Carrots (larger are easier to slice), zucchini, cucumber, radishes, toothpicks, spaghetti (uncooked), paper plates or cutting boards, napkins, plastic knives, protractor(optional).
|
1.
|
Draw the structure of four simple macromolecules (Virtual Chembook - Teacher Resource 11)
|
|
2.
|
Draw a key on the board; Hydrogen - carrots
|
-
Carbon - zucchini
-
Oxygen - cucumber
-
Nitrogen - radishes
-
(or other vegetables such as; parsnips, yellow squash, young and thin, green bananas, anything that slices into circles can be used instead of above)
-
3. Formulas; Water - H2O
-
Carbohydrate - C
6
H
12
O
6
(glucose)
-
Protein - NH
2
-CH
2
-COOH (glycine)
-
Lipid - CH
3
(CH
2
)
10
CO
2
H (lauric acid)
|
4.
|
Ask students to slice vegetable in thin slices, less than 1 cm.
|
|
5.
|
Tell students use the vegetables to make each molecule on their plate.
|
|
6.
|
Ask students to use the toothpick to 'stick' molecules holes in the vegetable slice before inserting a piece of spaghetti to form bonds between atoms.
|
|
7.
|
Students can eat each molecule after the teacher checks it for accuracy.
|
|
8.
|
An extension could be to measure the angles of the bonds using a protractor- The teacher might even give a prize for the molecule that is closest to the actual one.
|
-
9. Use Virtual Chembook http://www.elmhurst.edu/~chm/vchembook/index.html or Natural Products at http://www.cem.msu.edu/~reusch/VirtualText/biomol.htm to show students other carbohydrates, proteins, and lipids if possible.
Lesson Plan 4 Wrap it up!
Objectives
Identify three macromolecules in a wrap sandwich
Describe how each macromolecule contributes to the cell
Identify questions that can be answered through scientific investigation
Use appropriate tools and techniques to make observations and gather data
Lab Activity 4.1
-
1. Using flour tortillas make a wraps students
-
2. Cut the wraps into slices and give each student a piece to experiment with.
|
3.
|
Ask the students to unroll the wrap and describe the contents in terms of
|
-
macromolecules (see Worksheet 3 in Appendix B)
|
4.
|
Suggested 'stuffings'; lettuce (water), tomato (carbohydrate, water), cheese (lipid,
|
-
protein)-turkey (protein, lipid) and mayonnaise (protein, lipid).
|
5.
|
After the students have completed the worksheet (and if you can afford it!) let them make a wrap of their own to eat, this is a great lead into nutritional eating!
|