The majority of the classroom activities are set up for the students to work in a small group and discover what will happen. For most of the science experiments, the journal pages will be blank with just the experiment name on the top, unless otherwise specified. I suggest make journals a head of time otherwise have students keep paper in a folder.
1.) Lesson 1: Mystic Green: Exploration Lesson (sugar and colored water)
Objectives:
Students will explore with solids and liquids.
Students will describe using their senses what is occurring.
Students will record the sequence of what they did.
Materials:
Science journals (one per person), Pencils, Crayons, One bowl per group, Spoon, Sugar for each group, Water (add food coloring, not blue), two ice cube trays
Vocabulary:
Mixtures are the combination of two or more solids or liquids that are put together and stirred.
Procedure:
|
1.
|
Explain to the students that when we cook, the foods we use are called ingredients.
|
|
2.
|
Explain to the student that they will be working in groups to create a new mixture.
|
|
3.
|
Explain to the students that they will:
|
|
°¤
|
Draw a picture of each ingredient before you add them
|
|
°¤
|
Add the ingredients together (use as much or as little of each ingredient as
|
|
|
|
they choose)
|
|
°¤
|
Use the spoon to stir them.
|
|
°¤
|
Record what happened when the two ingredients were combined (in
|
|
|
|
journal under when ingredients are combined)
|
|
4.
|
Pass out journals, give a 1/2 cup of sugar and 1/2 cup of colored water.
|
|
5.
|
Have students write their name on the front cover of the journal.
|
|
6.
|
Students will turn to page 1 of journal.
|
|
7.
|
In their journals, each student points to space that says ingredient 1: have them draw a picture of what one of the ingredients. Repeat for ingredient 2.
|
|
8.
|
Tell them to go ahead and combine the ingredients together, record how many teaspoons of sugar and water they add to their cups. Using the spoon to stir them.
|
|
9.
|
In journals, have them complete the last sections, when ingredients are combined.
|
|
10.
|
Students will share what they discovered.
|
|
11.
|
Explain, they created a mixture using sugar and water. Explain the term mixture.
|
|
12.
|
Possible discussion questions: How did the ingredients change? Did you
|
|
|
|
need to use more of one ingredient then another?
|
|
13.
|
Place 2 teaspoons of sugar and then green colored water into ice cube trays.
|
|
|
|
Make enough ice cubes so each group gets one cube. Place in freezer
|
|
|
overnight. The ice cubes will be used for the freezing, melting and
|
|
|
|
evaporation experiment, lesson 4.
|
2.) Lesson 2: Changes
Objectives:
Students will learn the definition of change.
Students will provide examples of changes in their lives.
Materials:
chart paper, marker, journals, pencils, crayons
Vocabulary:
Changes are when something becomes different in some way, it may have a different look, color, shape, texture or taste to it.
Procedure:
Begin to talk with the students about what a change is. Use examples from their lives and from some of the foods they may eat, such as chocolate milk, brownies, eggs, and pancakes. Discuss with them that as they describe something one should use their five senses to provide a better description. Create a chart listing the definition and have the students provide an example of each.
3.) Lesson 3: Defining solids, liquids, and gasses - examples
Objectives:
Students will understand the difference between a solid, liquid and gas.
Students will learn about solids, liquids and gases in their lives.
Students will provide an example of a solid, a liquid and a gas.
Students will classify foods as either a solid or a liquid.
Students will create a chart of solids and liquids.
Students will sort foods into a solid or liquid.
Materials:
Pictures from magazines, Play food from kitchen center, Student snacks, chart paper, marker, tape or glue, journals, pencils, crayons
Procedure:
Discuss with the students the definitions of a solid, liquid, gas and mixture. Create a chart listing the definition and have the students provide an example of each. Provide examples for gases, as these will be the hardest for students to come up with.
After showing United Streaming video, Properties of Matter, Part 1, see if the students can add to the chart.
Vocabulary:
Solids are any food that has a shape. A solid can be held in your hands without falling onto the floor. If you put a solid down it will stay in the spot you placed it. Liquids are any substance that flows. If you put it on a table the fluid would roll off onto the floor.
Gases are invisible and are all around us.
4.)
|
Lesson 4: Freezing, Melting, Evaporation (sugar and colored water ice cubes)
|
|
This is an experiment you will observe over a week or more time. Students should record what changes they notice every day or every other day, depending on what changes are occurring.
Objectives:
Students will observe how a mixture has changed.
Students will understand the terms freezing, melting, evaporation.
Students will describe how the liquid and solid have changed.
Students will understand how freezing, melting, and evaporating happen in term
of weather.
Materials:
Ice cubes from Mystic Green Experiment, journals, pencils, crayons, clear plastic containers (1 per group), 2 teaspoons of sugar, and green colored water.
Vocabulary:
Melting is when a solid becomes a liquid.
Freezing is when a liquid becomes a hard solid.
Evaporation is when a liquid disappears into the air and becomes a gas.
Procedure:
-
1. Explain to them that you made a mixture of sugar and colored water and placed it into the freezer the other day.
-
2. Place one ice cube into a clear plastic container for each group.
-
3. Students will discuss and record the changes they observe.
-
Possible questions:
-
What did the liquid become? Why do you think that?
-
4. Explain to the students the concept of freezing.
-
5. After students make their observations move the containers to a window.
-
6. The next day, have the students get their containers. Students will discuss and record the changes they observe.
-
Possible questions:
-
What happened to the ice cube? Why do you think that?
-
7. Now that ice has melted, mark each container at top of water level.
-
8. Students will continue to monitor until water evaporates. This may take several days or a week depending on the temperature in the classroom.
-
9. Explain the process of evaporation to the students, as they notice the water level is decreasing. Students will record their observations.
-
10. After water has evaporated, have the students discuss what has happened.
-
11. A variation is to heat the sugar mixture to observe the effects heat has on evaporation. A discussion can be had about why the heated sugar mixed evaporated faster then the other sugar mixture.
-
Possible extensions: Exploring the water cycle and Weather and seasons.
5.) Lesson 5 - 8: Experiments with milk, seltzer, vinegar, oil
Objectives:
Students will create a mixture.
Students will discuss changes that occur.
Students will discuss similarities between two mixtures.
Students will discuss differences between two mixtures.
Students will record the changes that occurred.
Materials:
2 containers per group, 2 spoons per group, 1/4 cup flour, 1/4 cup baking soda, 2 - 1/4 cup liquid - day 1: milk, day 2: seltzer, day 3: vinegar, day 4: oil, Journals, Paper towels, 4 copies per student of Experimenting with Liquids and Solids Worksheet (following Appendix section) (Lemon juice can also be used instead of the vinegar)
Vocabulary:
Ingredients are the foods we use in a recipe.
Recipe is something you follow to make a particular food dish.
Mixtures are the combination to two or more solids or liquids that you put together.
Procedure:
|
1.
|
Explain to the students that they will be creating mixtures.
|
|
2.
|
Each group will get a 1/2 cup of flour and a 1/2 cup of baking soda.
|
|
3.
|
In journal, describe what each of the ingredients looks like. Draw a picture.
|
|
4.
|
Do not mix the solids together. (Mention several times)
|
|
5.
|
Each group will get two 1/4 cups of milk. (Liquid depends on which day)
|
|
6.
|
In one of the containers, you will add some of the solid. They can add as much or as little as they wish. Have students count and record the number of teaspoons they add.
|
|
7.
|
Then, add some of the liquid into your container.
|
|
8.
|
Observe what happens. Record what happened in your journal.
|
|
9.
|
Repeat creating the second mixture.
|
|
10.
|
Clean up. Bring students back to carpet and ask them to discuss what they
|
|
noticed.
|
|
11.
|
Possible questions: What did you notice happening when you added the liquid?
|
|
How did the flour or baking soda change?
|
|
12.
|
Variations: half the class can work with one liquid while the other class works
|
|
with another. The students can then report their finding to the class. Also,
|
|
depending on time, the students can work on one or two of the experiments each
|
day.
|
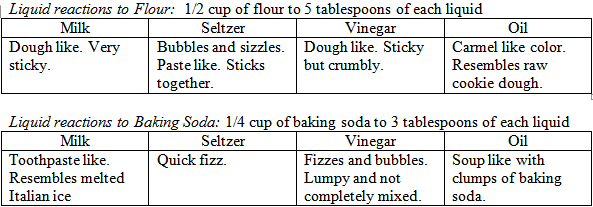
As the mixtures sit, the mixture hardens and a liquid layer begins to form on all mixtures except the oil.
6.) Lesson 9: Wiggling About Demo (gelatin)
Objectives:
Students will understand how temperature changes a liquid to a solid.
Students will compare the appearance and texture of two kinds of gelatin.
Materials:
Gelatin, Gelatin Jigglers, 2 spoons, 2 bowls with tops, 2 baking pans, butter knife, spatula, journals, pencils, crayons
7.) Lesson 10: Temperature and a liquid - Creamy Bag (Making Ice Cream)
Objectives:
Students will transform a liquid into a solid.
Students will describe the changes occurring.
Students will use their five senses to explain the changes.
Students will write in their journals, describing what occurs.
Materials:
measuring cups and spoons, large bowl, rolling pin, freezer bags, 6 cups crushed ice, 1 cup rock salt, ½ cup of half and half, ½ cup heavy cream, 2 tablespoons sugar, ¼ teaspoon vanilla extract, paper towels
Vocabulary:
Heat is how hot a food gets.
Temperature is how hot or cold something feels when you touch it.
Use either recipe: http://crafts.kaboose.com/coffee-can-ice-cream.html or http://crafts.kaboose.com/ice-cream-in-a-bag.html
8.) Lesson 11: Temperature and a solid - Chocolate Fountain (Melting Chocolate)
Objectives:
Students will observe how a solid becomes a liquid.
Students will describe the changes occurring.
Students will use their five senses to explain the changes.
Students will write in their journals, describing what occurs.
Materials:
Chocolate (morsels, candy bars or chocolate wafers found in a craft store for molds), double boiler, water, spoon, paper towels, journals, pencils, crayons
Do Not let any water get into the chocolate or it will not melt. It becomes very hard and difficult to work with.
8.) Lesson 12: Seedlings: Growing a Radish
Objectives:
Students will understand the changes that occur as a seed grows.
Students will describe and record the changes that occur when a seed grows into
a plant.
Materials:
Radish seeds, paper towels, water, flat caps or plastic plates, tape, rubber bands, plastic wrap