Christine A. Elmore
To organize learned information about buttons on charts and graphic organizers.
To gain an understanding of unit content through discussion with others.
To use inquiry notebooks to organize information and to review what my students have learned.
To learn about cause and effect through the use of games and written activities.
To develop a familiarity with geography and a spatial sense of history through the use of world maps.
To understand how history connects the present with the past by creating an autobiographical timeline.
To analyze the impact that certain events had on the button industry through the use of maps, graphic organizers and timelines.
To make text-to-world connections about the past by viewing and analyzing the data on a large T-chart.
To compare fashion in men's and women's clothing through the ages, particularly noting the extent to which buttons were used, by examining photographs and pictures taken from various sources.
To learn about the use of buttons from the past to the present through the use of children's literature.
To create a whole-class descriptive report together that will serve to classify and present facts that explain buttons, their use and origin.
Section I: Teaching History to Children
Teaching history to young children really can be successfully undertaken when the proper methods and teaching tools are employed. It is all a matter of making history come alive for them. First-graders have a limited ability to deal with time. After all, they have only been alive for five or six years and conceiving of century-long time spans may appear daunting to them at first. Using the right tools, however, will make this task much easier.
We will begin our study by considering the question, What is history? After writing down my young learners' ideas, I will guide them to the understanding that history is a story, a progression of events, and each one of us has one. In an effort to make this concept more meaningful I will begin with an activity that requires my students to think about what a typical school day looks like for them in one- and two-hour increments. In each box they will draw a picture of what they routinely do during that time period. The chart might look like this:
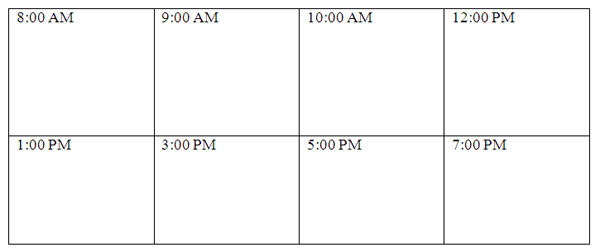
They will use their chart to refer to as they detail their daily activities with a partner. From there we will move on to a whole-group activity where a chart of memorable school experiences, month by month, is created. This activity will help them develop a view of history as a sequence of events in time. Such a chart might look like this:
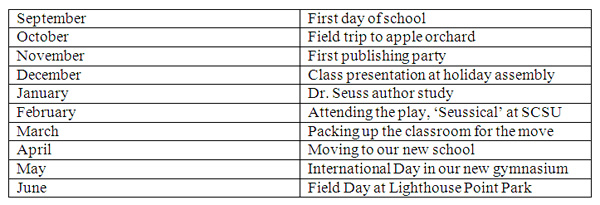
Sitting in a discussion circle, students will share their ideas, recalling the events and specific memorable details. They will also be asked to try to see the interconnectedness of some of the events as well as see some of the changes they as a class have undergone as the year has progressed.
To help my students build a clearer understanding of time and chronology I will hold a discussion where the following questions will be asked:
What is time?
How do animals measure time (
i.e.,
hibernation, life cycles, nocturnal animal habits)?
How do people measure time (
i.e.,
seasons, birthdays, anniversaries)?
Why do we need to divide time into hours or days or months?
This is a fitting time to describe and define the terms: minute, hour, day, week, month, year, decade and century. Knowledge of these terms, especially the last three, are important as we begin our use of timelines. I will also introduce transition words and phrases that relate to time like: before, after, first, next, finally, during, as a result, and encourage students to use these words in our discussions and in their writing about events.
The timeline is a very valuable teaching tool that helps students create a sense of how history connects the present with the past. It also helps them remember important events and it gives them some sense of development and of cause and effect. The first timeline I will use with be autobiographical in nature and will cover a span of 5-6 years for my students. Parents will be asked to help them fill out a planning organizer together like the one below, filling it with memorable events in one column and the age the child was at the time in the other:
Once the organizer is completed, students will transfer the information onto a six-box timeline template as featured in the book
Mini-Lessons for Teaching About Nonfiction
by Diane Farhnam, Paula Jensvold and Brigid Kulhowvick (p. 71). On this template made of cardstock, students will plot the dates, write one-sentence event descriptions and draw pictures that match each event. Students will share their personal histories in class. See Lesson Plan I for specific details.
A second timeline will display 20
th
century toys and games starting at 1900 and ending at 2002. (To access this information, go to www.factmonster.com). For this activity I will use a wall timeline format using a series of sentence strips arranged horizontally, one below the other on a wall of the classroom. Entries will include the following:
1900 baseball cards
1901 ping pong
1902 teddy bear
1909 jigsaw puzzle
1918 raggedy ann doll
1929 yo-yo
1933 monopoly
1943 chutes and ladders
1944 silly putty
1946 tonka trucks
1949 candyland
1957 frisbee
1959 barbie doll
1960 toy trolls
1975 skateboarding
1983 cabbage patch kinds doll
1986 american girl doll
1989 teenage mutant ninja turtles
1990 rollerblading
1994 beanie babies
1966 tickle me elmo
1998 rescue heroes
2002 yu-gi-oh starter deck
On the timeline the specific year will be plotted and I will ask individuals to go up, locate the year and tape the photo I have made of the toy/game under that year. Discussion questions will include:
Name something that kids still use today.
Why are baseball cards and Barbie dolls still popular today?
What toys do both boys and girls like?
Which games require a lot of skill?
Which games can you play alone?
Why are trolls no longer popular with kids today?
Name some toys that kids your age like today. How are they different from the toys and games on this timeline?
What do games and toys tell you about kids during that time period?
Other effective visuals that I will use in this unit are world maps, which provide children with both a familiarity with geography and a spatial sense of history, and photographs, which make things appear more real. My instruction will also be greatly enhanced by the use of children's literature, which will help them foster an interest in the past. By using such visuals the teacher can make the teaching of history both stimulating and memorable.
Hands-on participation piques children's interest and helps increase retention of ideas and so the class will also be engaged in button sorting activities and games and they will have fun making buttons of our own. In the next section we will begin our study of buttons through exploration.
Section 2: Button Exploration
It is through inquiry that we begin our exploration of the button. Sitting in our discussion circle, I will ask the following thought-provoking questions:
Why were buttons invented?
What do you know about buttons?
Why didn't people stop using buttons when the zipper was invented?
Following our discussion I will chart their ideas using the RAN (Reading and Analyzing Nonfiction) strategy developed by Tony Stead in his book,
Reality Checks
(p. 17-19). The chart will look like this:

Charting the information in this way allows us to confirm true facts that we encounter in our readings and add new information as we find it. It also leaves space for our own questions that arise throughout our study of buttons.
In the next activity I will read the book entitled
Grandma's Button Box
by Linda Williams Abe to my class. In this story the children set out to organize all the buttons accidentally spilled from their grandmother's button box. They end up sorting them in different ways, by shape, color and size. Several extension questions/statements that I will include are:
Would you have sorted Grandma's buttons in a different way?
What did you learn about buttons from this story?
Do you have a favorite button at home? Describe it.
Buttons can actually tell us a lot about a person. Keep this idea in mind as we continue our study.
Button Sorting
We will move to a more hands-on activity next. I will give each student a large handful of plastic buttons and ask that he/she sort them in different ways. I will then chart their findings on a matrix with such headings as color, shape, size and number of holes. A smaller facsimile of this chart will be given to each student and they will be asked to illustrate the possibilities under each heading. In a second activity students will create color-shape patterns with their buttons, a skill that they are very familiar with past math lessons.
Buttons Games
Students form a circle with one sitting blindfolded in the center. A large button is passed around from hand to hand while the group chants, "Round and round and round it goes. Where it stops, nobody knows." The student in the center yells stop at some random point and everyone closes both hands, pretending they have the button. The student removes the blindfold and looks carefully around the circle. He/she has three chances to guess correctly who is holding the button. The student holding the button then shows the button to everyone, gives it to a nearby classmate and proceeds to sit in the center for the next round.
Two other games we will play are included in the book entitled
Button, Button, Who's Got the Button?
by Hajo Bücken. The first is called 'Memory Button' where the teacher displays some buttons on a plate and allows the students to look at them carefully for about a minute. Then she covers them and asks students to try to describe what they saw in terms of number, shapes, color,
etc.
The second game is called 'Button Tower' where each student tries to build a tower of buttons that won't fall down. This activity requires patience and a steady hand.
A final activity for this section will be the actual making of buttons in two ways: 1) using polymer clay and 2) using dried skimmed milk powder and vinegar. See Lesson Plan 2 for details.
I plan to create a larger, more varied button collection by tapping two sources, parents and sewing notions stores. Working with larger assortments that include other materials will provide an ideal segue into our study of what buttons have been made of throughout history in Section 3.
Section 3: Comparing Buttons: Is the Newer Always the Better?
I will begin this section by asking my students to recall the different kinds of buttons that they have used in the sorting activities in class and list as many materials as they can that have been used to make buttons. Each child will compare his/her list with a partner and then contribute ideas for our class chart. After looking at the varieties shown in Joyce Whittemore's book,
The Book of Buttons
, I will ask:
How did people decide which materials they would use to make buttons?
Why did people stop using some materials?
What materials would you use for buttons on a pair of jeans, a wedding dress, a winter coat and a pair of pajamas? Why?
To provide more factual information on the history of button material, I will display the following facts on a large timeline:
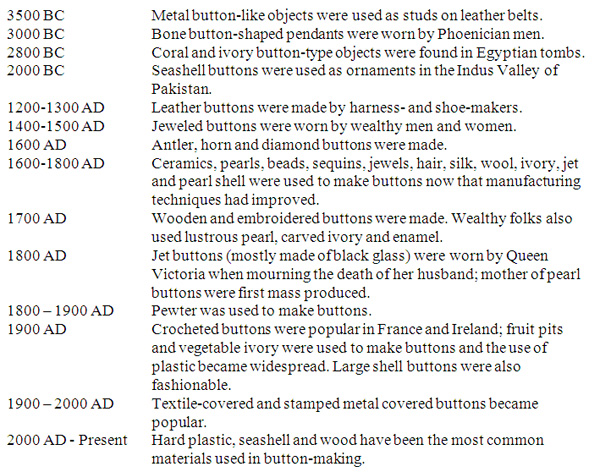
As I refer to the large wall timeline displaying button material use, I will also make use of
a large world map to point out the countries being referred to. I will ask my class to explain how they think news of button fashion spread during the time periods when there were no televisions or radios.
Before considering some of the events that impacted the button industry, it will be essential to help my young learners to better grasp the whole notion of cause and effect. I have designed questions throughout this unit that ask my students to consider why something has happened. I will begin with a visual activity to make my point. After lining up a series of dominoes, I will ask a student to give the first one in line a push and we will watch the effect it has on the rest. This activity will clearly show them the effect that one force can have on something. We will then play a game called 'Cause and Effect Toss' (which can be found on www.learnwhatsup.com) where students sit in a large circle and one student, holding a Nerf ball, says the first part of a cause and effect sentence like, When it started to rain… and tosses the ball to a second student in the circle who has to complete the sentence. This game continues with different players and sentences. If a student gets stuck, another student can offer to help out. Some other samples are:
He did not study for the test so…
A heavy snowstorm hit the city so…
Mary spilled the milk all over the floor so…
The farmer planted the seeds in his garden and after a few weeks…
The baby was sleeping so…
The traffic light turned red so…
I had a big toothache so---
There is a delightful animation on youtube.com demonstrating the cause and effect relationship entitled
The Butterfly Effect
. In it a cat, who has been eyeing a flying butterfly from his position on a couch for quite a while, finally leaps on top of a framed wall picture in a effort to catch the butterfly and ends up knocking the picture off the wall and a large cactus plant over onto the floor all in one fateful leap. Needless to say, the butterfly escapes unscathed. This animation, (The Butterfly Effect, clavisimo on youtube.com) created by Niv Bronstein, is cleverly accompanied by the theme song from the movie,
The Pink Panther
.
I will then turn to children's literature to further clarify this concept for the children. (Laura Numeroff has written a number of delightful books where one funny action leads to another I will use her classic story entitled
If You Give a Mouse A Cookie
in a lesson on cause and effect, along with a graphic organizer on which to record the various events (which can be found in detail in Lesson Plan 3).
To demonstrate the cause and effect relationship of historical events pertaining to the button industry, I will list the following events in the left column of a large T-chart labeled 'Causes' and ask my class to consider what effects they might have had on which materials were used to make buttons (recording students' ideas in the right column labeled 'Effects'.
During the late 1700s buttons began to be made in factories.
People found that it is easier and cheaper to use plastic to make buttons during the Industrial Revolution.
The divers in the South Pacific Islands began to charge more for their dangerous work and the price of mother of pearls increased.
Glass button factory workers complained of hot, unpleasant working conditions.
People passed laws to protect endangered animals like the elephant, whale and tortoise, whose body parts were often used to make buttons.
It is during these discussions that I will introduce inquiry notebooks in which my students will begin to take notes and write down (with my guidance) important ideas about buttons and their history. In these notebooks they will include pictures, diagrams and graphic organizers to display the information in ways that they can understand and which will serve as a tool for review of what they have learned. I will pattern this notebook after the 'super sleuth detective notebook found on the website, http://pbskids.org. which includes pages titled evidence collector, fact chart, question collector and summarizer. As we compare photos of buttons from different time periods, we will consider the question, Is the newer always the better? One conclusion we will discover is that beauty and individuality in button-making has been sacrificed for the sake of economy and efficiency. The exquisite hand-painted button has been largely replaced by the four-holed, purely functional plastic button.
We will learn in the next section that the button has gone through many changes through the years.
Section 4: Buttons and Fashion Through Time
Background
The button (from the French
bouton
) can be traced to prehistoric times and was used strictly as decoration until the Roman Empire when it became valued as a superior fastener to loops, ties and sashes. Initially it was cigar-shaped but later became round and varied in size, in the 16
th
century being quite small, but later in the 17
th
and 18
th
centuries becoming larger. It primarily took the form of a disk with a shank on the back that was sewed onto cloth. What made it such a versatile ornament was the fact that on this disk, paintings, carvings and embroidery could be placed. These buttons were cherished as small works of art and worn proudly. But, as Bethanne Kelly Patrick asserts in her book,
An Uncommon History of Common Things
, "buttons did not simply change the decoration of clothing; they changed the entire shape of clothing" (p.178). Clothes could now be more form-fitting. In addition, such fasteners also made it possible for clothing to stay on more securely. Interestingly, in Europe during the 17
th
and 18
th
centuries, buttons were featured primarily on men's clothing. It wasn't until the 19
th
century that women began to wear buttons more frequently.
Buttons effectively advertised a person's station in life. According to Carolyn L. White in her book,
American Artifacts of Personal Adornment, 1680-1820
, buttons "have great potential for understanding not only what people wore in the past but also what was communicated through appearance" (p. 50). A few examples will serve to make this point more clear. The peasantry in 13
th
century France were forbidden from using the beautiful jeweled buttons made by the Button Makers Guild for the wealthy. Instead, their buttons had to be made of plain cloth or thread. Buttons during the 17
th
and 18
th
centuries in Europe reflected one's social and economic status. Pewter buttons, for example, came to be associated with the clothing of the working class.
It was with the discovery of the button-hole that the button industry began to flourish. The button-hole was thought to have been used by the Saracens long ago but was only brought over to Europe by the Crusaders returning home from the Middle East in the 13
th
century. This discovery had a great impact on fashion where the button could play a very versatile role as a fastener.
How were buttons used in clothing in different times and places? We will explore this question through the use of pictures spanning different time periods and taken from such books as
Buttons
by Diana Epstein,
What People Wore
by Douglas Gorsline,
Costume
by L. Rowland-Warne,
Costumes of Everyday Life
by Margot Lister,
What People Wore When
by Melissa Leventon, and
A Pictorial History of Costume by Wolfgang Bruhn and Max Tilke
. Students will be paired up and given copies of some of these pictures to examine closely and compare and contrast. To help guide them in their exploration I will display the following questions:
How many buttons are used?
Where are the buttons located?
Are the buttons used more for show?
Does this piece of clothing remind you of anything you know?
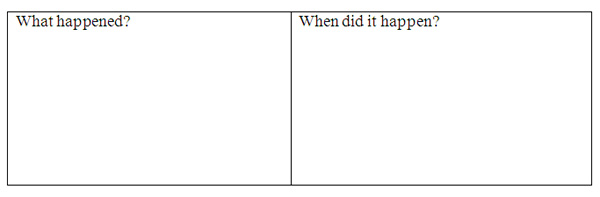
Student pairs will present their specific pictures of fashion to the whole group and will tape their pictures on a two-columned chart with the headings 'Fashion Then' and 'Fashion Now'. Using this chart I will ask the class to make some 'text-to-world connections' which Tony Stead warns in his previously mentioned book,
Reality Checks
, is more challenging because "the children need to think outside themselves to a larger world" (p.101). The type of connections I will be looking for might look like this:
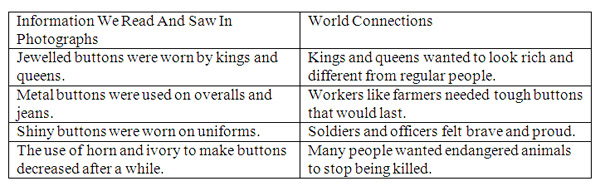
It is this type of inferring, an important type of historical thinking, that I will be asking my students to do.
As we view the differences in the way buttons looked and the ways they were used in fashion, both as decoration and as purely functional fasteners, I will ask the question: Is the newer product always the better?
There are three different pieces of children's literature that I plan to use in this section. The first is entitled
The Button Box
by Margarette S. Reid. In this book the reader learns something about the history of buttons and how they were used in fashion from different time periods both as fasteners and as ornamentation. They will see the varied shapes and sizes that exist as well as the different materials that were used to make them. The second book, entitled
Buttons
by Brock Cole, is a charming tale about a silly man who eats so much that he bursts his britches and all of the buttons fall into the fire. His three daughters go on a quest to find new buttons for him. This book is a perfect vehicle from which to discuss the utilitarian use of buttons and how fashion reflected the times where men wore britches and zippers were nonexistent. As an extension activity I will ask my students to design a piece of clothing suitable for kids nowadays on which buttons are used either as fasteners or as decoration. These drawing will be displayed on our 'high fashion' bulletin board.
A third book that I plan to use entitled
Buttons for General Washington
by Peter and Connie Roop, details how buttons were used during war time as containers. In this story, John, a young patriot, carries secret messages to George Washington in his coat buttons. Another name for this type of button is camouflaged buttons whose purposes are detailed in Lillian Smith Albert and Jane Ford Adams' book entitled
The Button Sampler
. For example, soldiers during the Civil War hid gold coins inside these buttons to use as ransom should they be caught; soldiers in World War I hid two-picture lockets of loved ones; and soldiers in World War II hid compasses to use should they be caught behind enemy lines. (pp. 18-20) One fun extension activity that I will use involves asking the students to write secret messages to their classmates that could be stored in such buttons.
Section 5: Bringing It Altogether
The culminating activity for this unit will begin as a whole-class investigation of the button and the final form will be a class big book. Tony Stead in his book
Is That A Fact?
describes the process in detail (p. 115-121). For our purposes I will offer a brief description:
Step 1: Collecting Information
Students will bring the information they have included in their inquiry notebooks to the discussion circle.
Step 2 Sorting the Information
I will chart their ideas categorizing them under 4 headings: Use, Shapes, Events and Forces That Have Changed Buttons, and Buttons in Fashion.
Step 3: Writing and Illustrating
With my guidance these ideas will then be written by the students in sentences on sentence strips. Each student will be given one sentence strip and a large piece of manila paper to illustrate on.
Step 4: Publishing
These completed pages will be laminated and bound in a big book entitled 'The Wonderful World of Buttons' and will be shared in class and perhaps the larger school population as well. This whole-class descriptive report will serve to classify and present facts that explain buttons, their use and origin.